Configuration
This guide walks you through configuring target Kubernetes or OpenShift clusters where you want to run chaos engineering scenarios.
Overview
Before running chaos experiments, you need to add one or more target clusters to the Krkn Operator. Target clusters are the Kubernetes/OpenShift clusters where chaos scenarios will be executed. You can add multiple target clusters and manage them through the web console.
Accessing Cluster Configuration
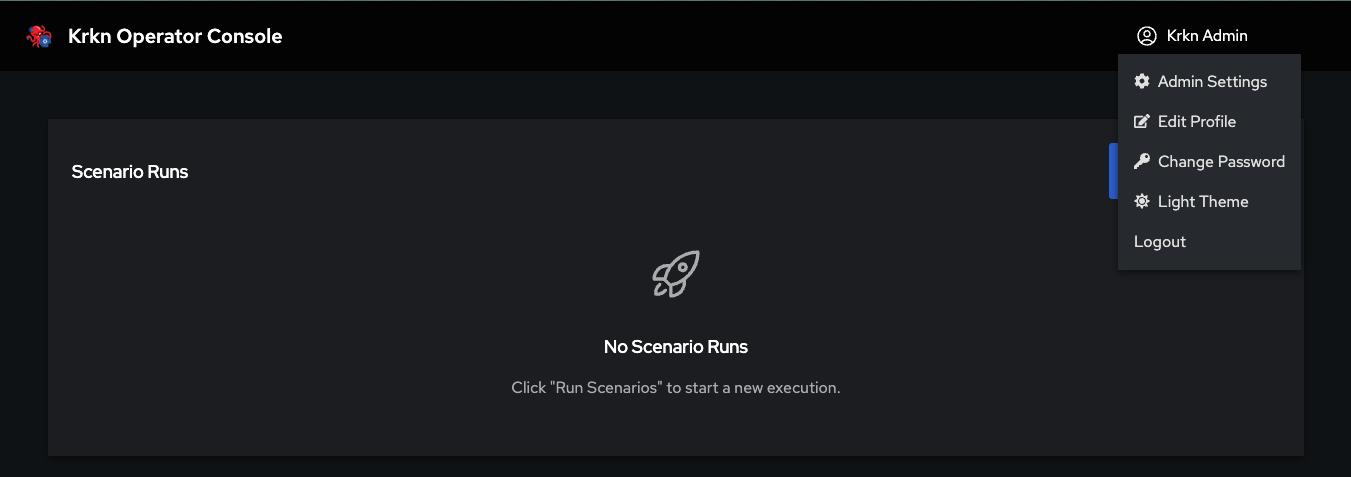
Step 1: Open Admin Settings
Log in to the Krkn Operator Console and click on your profile in the top-right corner. Select Admin Settings from the dropdown menu.
Step 2: Navigate to Cluster Targets
In the Admin Settings page, click on the Cluster Targets tab in the left sidebar. This will show you a list of all configured target clusters (if any).
Adding a New Target Cluster
Step 3: Open the Add Target Dialog
Click the Add Target button in the top-right corner of the Cluster Targets page. This will open the “Add New Target” dialog.
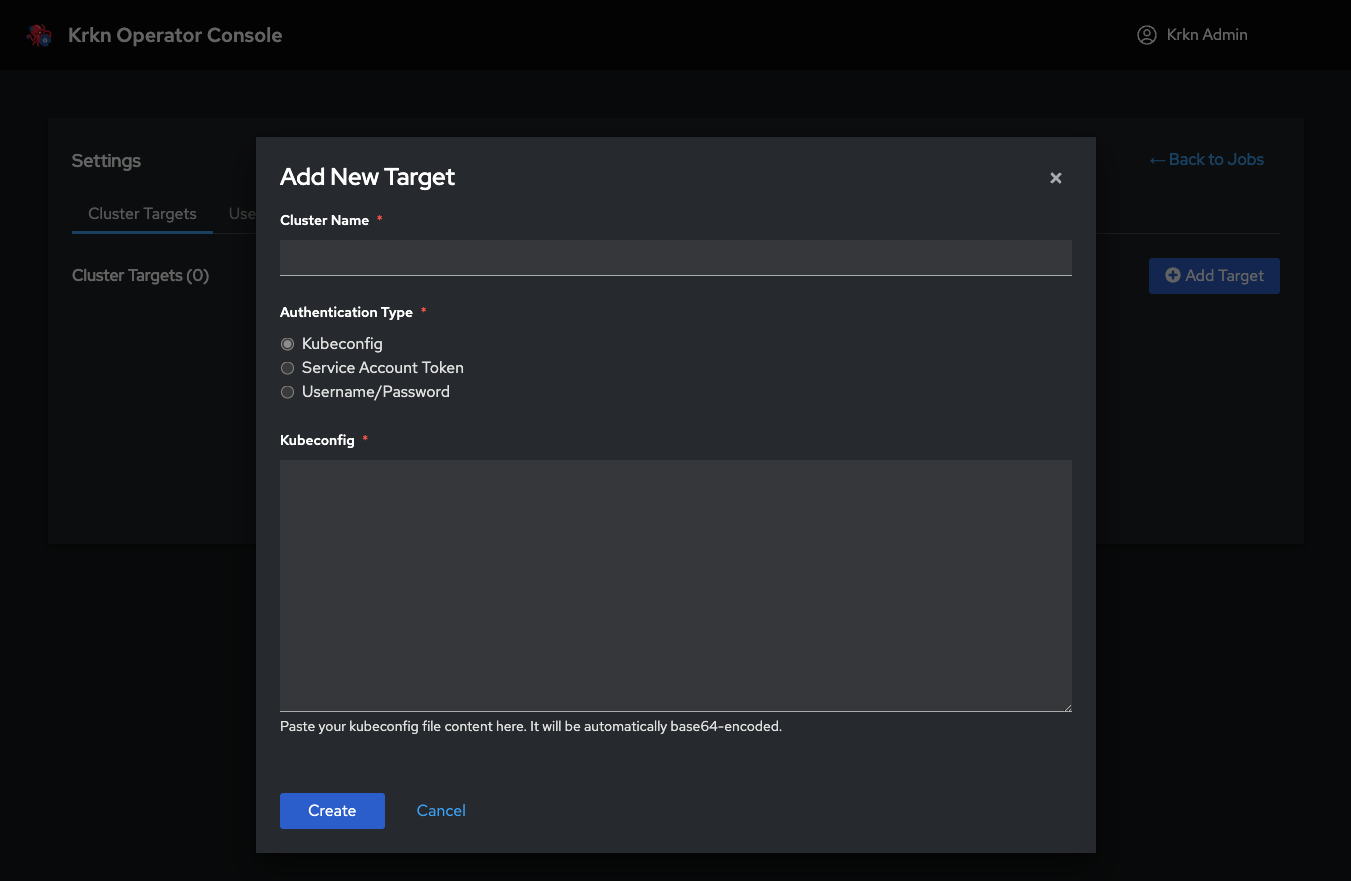
Step 4: Enter Cluster Information
You’ll need to provide:
Cluster Name (required): A friendly name to identify this cluster (e.g., “Production-US-East”, “Dev-Cluster”, “OpenShift-QA”)
Authentication Type (required): Choose one of three authentication methods:
- Kubeconfig - Full kubeconfig file (recommended)
- Service Account Token - Token-based authentication
- Username/Password - Basic authentication (for clusters that support it)
Authentication Methods
The Krkn Operator supports three different ways to authenticate to target clusters. Choose the method that best fits your cluster’s security configuration.
Method 1: Kubeconfig (Recommended)
This is the most common and recommended method. It uses a complete kubeconfig file to authenticate to the target cluster.
When to use:
- You have direct access to the cluster’s kubeconfig file
- You want to authenticate with certificates or tokens defined in the kubeconfig
- The cluster supports standard Kubernetes authentication
How to configure:
- Select Kubeconfig as the Authentication Type
- Obtain the kubeconfig file for your target cluster:
# For most Kubernetes clusters kubectl config view --flatten --minify > target-cluster.kubeconfig # For OpenShift clusters oc login https://api.cluster.example.com:6443 oc config view --flatten > target-cluster.kubeconfig - Open the kubeconfig file in a text editor and copy its entire contents
- Paste the kubeconfig content into the Kubeconfig text area in the dialog
- Click Create
Example kubeconfig content:
apiVersion: v1
kind: Config
clusters:
- cluster:
    certificate-authority-data: LS0tLS1CRUdJTi...
    server: https://api.cluster.example.com:6443
  name: my-cluster
contexts:
- context:
    cluster: my-cluster
    user: admin
  name: my-cluster-context
current-context: my-cluster-context
users:
- name: admin
  user:
    client-certificate-data: LS0tLS1CRUdJTi...
    client-key-data: LS0tLS1CRUdJTi...
Method 2: Service Account Token
Use this method if you want to authenticate using a Kubernetes Service Account token.
When to use:
- You want fine-grained RBAC control over what the operator can do
- You’re following a zero-trust security model
- You want to create a dedicated service account for chaos testing
How to configure:
Create a service account in the target cluster with appropriate permissions:
# Create service account
kubectl create serviceaccount krkn-operator -n krkn-system

# Create ClusterRole with necessary permissions
kubectl create clusterrolebinding krkn-operator-admin \
  --clusterrole=cluster-admin \
  --serviceaccount=krkn-system:krkn-operator

# Get the service account token
kubectl create token krkn-operator -n krkn-system --duration=8760h
In the “Add New Target” dialog:
- Enter a Cluster Name
- Select Service Account Token as the Authentication Type
- Enter the API Server URL (e.g.,
https://api.cluster.example.com:6443) - Paste the Service Account Token you generated
- (Optional) Provide CA Certificate data if your cluster uses a self-signed or custom Certificate Authority
- Click Create
About CA Certificate (Optional):
The CA Certificate field is optional and only needed in specific scenarios:
- When to provide it: If your cluster uses a self-signed certificate or a custom/private Certificate Authority (CA) that is not trusted by default
- When to skip it: If your cluster uses certificates from a public CA (like Let’s Encrypt, DigiCert, etc.) or standard cloud provider certificates
- What it does: The CA certificate allows the Krkn Operator to verify the identity of your cluster’s API server and establish a secure TLS connection
- How to get it: Extract the CA certificate from your cluster’s kubeconfig file (the
certificate-authority-datafield, base64-decoded) or from your cluster administrator
Example of extracting CA certificate from kubeconfig:
# Extract and decode CA certificate
kubectl config view --raw -o jsonpath='{.clusters[0].cluster.certificate-authority-data}' | base64 -d > ca.crt
Method 3: Username/Password
Use basic authentication with a username and password. This method is only supported by clusters that have basic auth enabled.
When to use:
- Your cluster supports basic authentication
- You’re testing in a development environment
- You have credentials for a user with appropriate permissions
How to configure:
- In the “Add New Target” dialog:
- Enter a Cluster Name
- Select Username/Password as the Authentication Type
- Enter the API Server URL (e.g.,
https://api.cluster.example.com:6443) - Enter your Username
- Enter your Password
- (Optional) Provide CA Certificate data if your cluster uses a self-signed or custom Certificate Authority
- Click Create
About CA Certificate (Optional):
Same as with token authentication, the CA Certificate is optional:
- When needed: Only if your cluster uses self-signed certificates or a custom/private Certificate Authority
- When to skip: If using public CA certificates or standard cloud provider setups
- Purpose: Enables secure TLS verification when connecting to the cluster’s API server
Verifying Target Cluster
After adding a target cluster, the Krkn Operator will attempt to connect to it and verify the credentials.
Successful Configuration
If the cluster is configured correctly, you’ll see it appear in the Cluster Targets list with a green status indicator. You can now use this cluster as a target for chaos scenarios.
Troubleshooting Connection Issues
If the cluster connection fails, check the following:
| Issue | Possible Cause | Solution |
|---|---|---|
| Connection timeout | Incorrect API server URL | Verify the API server URL is correct and accessible from the operator |
| Authentication failed | Invalid credentials | Re-check your kubeconfig, token, or username/password |
| Certificate error | CA certificate mismatch | Provide the correct CA certificate for clusters with custom CAs |
| Permission denied | Insufficient RBAC permissions | Ensure the service account or user has cluster-admin or necessary permissions |
| Network unreachable | Firewall or network policy | Ensure the Krkn Operator can reach the target cluster’s API server |
You can view detailed error messages in the operator logs:
kubectl logs -n krkn-operator-system -l app.kubernetes.io/name=krkn-operator -c manager
Managing Target Clusters
Viewing Configured Clusters
Navigate to Admin Settings → Cluster Targets to see all configured target clusters. Each cluster shows:
- Cluster name
- Connection status
- Last verified time
- Authentication method used
Editing a Target Cluster
To modify an existing target cluster:
- Click the Edit button next to the cluster in the list
- Update the cluster name or authentication credentials
- Click Save
Removing a Target Cluster
To remove a target cluster:
- Click the Delete button next to the cluster in the list
- Confirm the deletion
Required Permissions
The service account or user used to connect to target clusters needs the following permissions:
Minimum RBAC Permissions
For most chaos scenarios, the operator needs cluster-admin privileges or at least these permissions:
apiVersion: rbac.authorization.k8s.io/v1
kind: ClusterRole
metadata:
  name: krkn-operator-target-access
rules:
# Pod chaos scenarios
- apiGroups: [""]
  resources: ["pods", "pods/log", "pods/exec"]
  verbs: ["get", "list", "watch", "create", "delete", "deletecollection"]

# Node chaos scenarios
- apiGroups: [""]
  resources: ["nodes"]
  verbs: ["get", "list", "watch", "update", "patch"]

# Deployment/StatefulSet/DaemonSet scenarios
- apiGroups: ["apps"]
  resources: ["deployments", "statefulsets", "daemonsets", "replicasets"]
  verbs: ["get", "list", "watch", "update", "patch", "delete"]

# Service and networking scenarios
- apiGroups: [""]
  resources: ["services", "endpoints"]
  verbs: ["get", "list", "watch", "create", "update", "delete"]

- apiGroups: ["networking.k8s.io"]
  resources: ["networkpolicies"]
  verbs: ["get", "list", "watch", "create", "update", "delete"]

# Namespace scenarios
- apiGroups: [""]
  resources: ["namespaces"]
  verbs: ["get", "list", "watch"]

# Job creation for scenario execution
- apiGroups: ["batch"]
  resources: ["jobs"]
  verbs: ["get", "list", "watch", "create", "update", "delete"]

# Events for monitoring
- apiGroups: [""]
  resources: ["events"]
  verbs: ["get", "list", "watch"]
Route, DeploymentConfig, and Project.Best Practices
Use Dedicated Service Accounts: Create a dedicated service account in each target cluster specifically for chaos testing. This makes it easier to audit and control permissions.
Rotate Credentials Regularly: Periodically rotate kubeconfig files and service account tokens to maintain security.
Test Connectivity First: After adding a target cluster, run a simple non-destructive scenario to verify connectivity before running destructive chaos tests.
Organize by Environment: Use clear naming conventions like
prod-us-east-1,staging-eu-west,dev-localto easily identify clusters.Limit Production Access: Consider restricting production cluster access to specific users or requiring additional approval workflows.
Monitor Operator Logs: Regularly check operator logs for authentication errors or connection issues.
ACM/OCM Integration (Advanced)
For organizations using Red Hat Advanced Cluster Management (ACM) or Open Cluster Management (OCM), the Krkn Operator provides seamless integration that automatically discovers and manages all ACM-controlled clusters as chaos testing targets.
What is ACM/OCM?
Advanced Cluster Management (ACM) and Open Cluster Management (OCM) are multi-cluster management platforms that allow you to manage multiple Kubernetes and OpenShift clusters from a single hub cluster. ACM/OCM provides:
- Centralized cluster lifecycle management - Deploy, upgrade, and manage multiple clusters
- Application deployment across clusters - Deploy applications to multiple clusters with policies
- Governance and compliance - Apply security and compliance policies across your fleet
- Observability - Monitor metrics, logs, and alerts from all managed clusters
How ACM Integration Works
When the ACM integration is enabled in the Krkn Operator, the krkn-operator-acm component automatically:
- Discovers all managed clusters registered with your ACM/OCM hub
- Imports them as chaos testing targets into the Krkn Operator console
- Keeps the cluster list synchronized as new clusters are added or removed from ACM
- Authenticates automatically using ACM’s
ManagedServiceAccountresources—no manual credential management required
Benefits of ACM Integration
| Feature | Manual Configuration | ACM Integration |
|---|---|---|
| Cluster Discovery | Manual - add each cluster individually | Automatic - all ACM-managed clusters |
| Credential Management | Manual - maintain tokens/kubeconfig per cluster | Automatic - uses ManagedServiceAccount |
| Cluster Updates | Manual - update credentials when they change | Automatic - ACM handles rotation |
| New Clusters | Manual - must add explicitly | Automatic - discovered immediately |
| Security | Per-cluster authentication | Centralized ACM RBAC with fine-grained control |
Enabling ACM Integration
Step 1: Install with ACM Enabled
To enable ACM integration, install the Krkn Operator with the ACM component enabled via Helm:
helm install krkn-operator oci://quay.io/krkn-chaos/charts/krkn-operator \
  --version <VERSION> \
  --set acm.enabled=true \
  --namespace krkn-operator-system \
  --create-namespace
Or add it to your values.yaml:
acm:
  enabled: true
  replicaCount: 1

  resources:
    requests:
      cpu: 100m
      memory: 128Mi
    limits:
      cpu: 200m
      memory: 256Mi

  logging:
    level: info
    format: json
For complete installation instructions and additional configuration options, see the Installation Guide.
Step 2: Verify ACM Component
After installation, verify that the ACM component is running:
kubectl get pods -n krkn-operator-system -l app.kubernetes.io/component=acm

# Expected output:
# NAME                                  READY   STATUS    RESTARTS   AGE
# krkn-operator-acm-xxxxxxxxx-xxxxx     1/1     Running   0          2m
Check the ACM component logs to see cluster discovery in action:
kubectl logs -n krkn-operator-system -l app.kubernetes.io/component=acm

# You should see logs like:
# INFO  Discovered 5 managed clusters from ACM
# INFO  Synced cluster: production-us-east
# INFO  Synced cluster: staging-eu-west
Configuring ManagedServiceAccounts (Fine-Grained Security)
One of the most powerful features of ACM integration is the ability to use ManagedServiceAccounts for authentication to target clusters. This provides fine-grained, per-cluster security control.
What are ManagedServiceAccounts?
ManagedServiceAccounts are a feature of OCM/ACM that allows the hub cluster to create and manage service accounts on spoke clusters. Instead of using a single highly-privileged service account (like open-cluster-management-agent-addon-application-manager), you can create dedicated service accounts with custom RBAC permissions for each cluster.
Configuring Per-Cluster Service Accounts
Navigate to Admin Settings → Provider Configuration → ACM to configure which ManagedServiceAccount to use for each cluster:
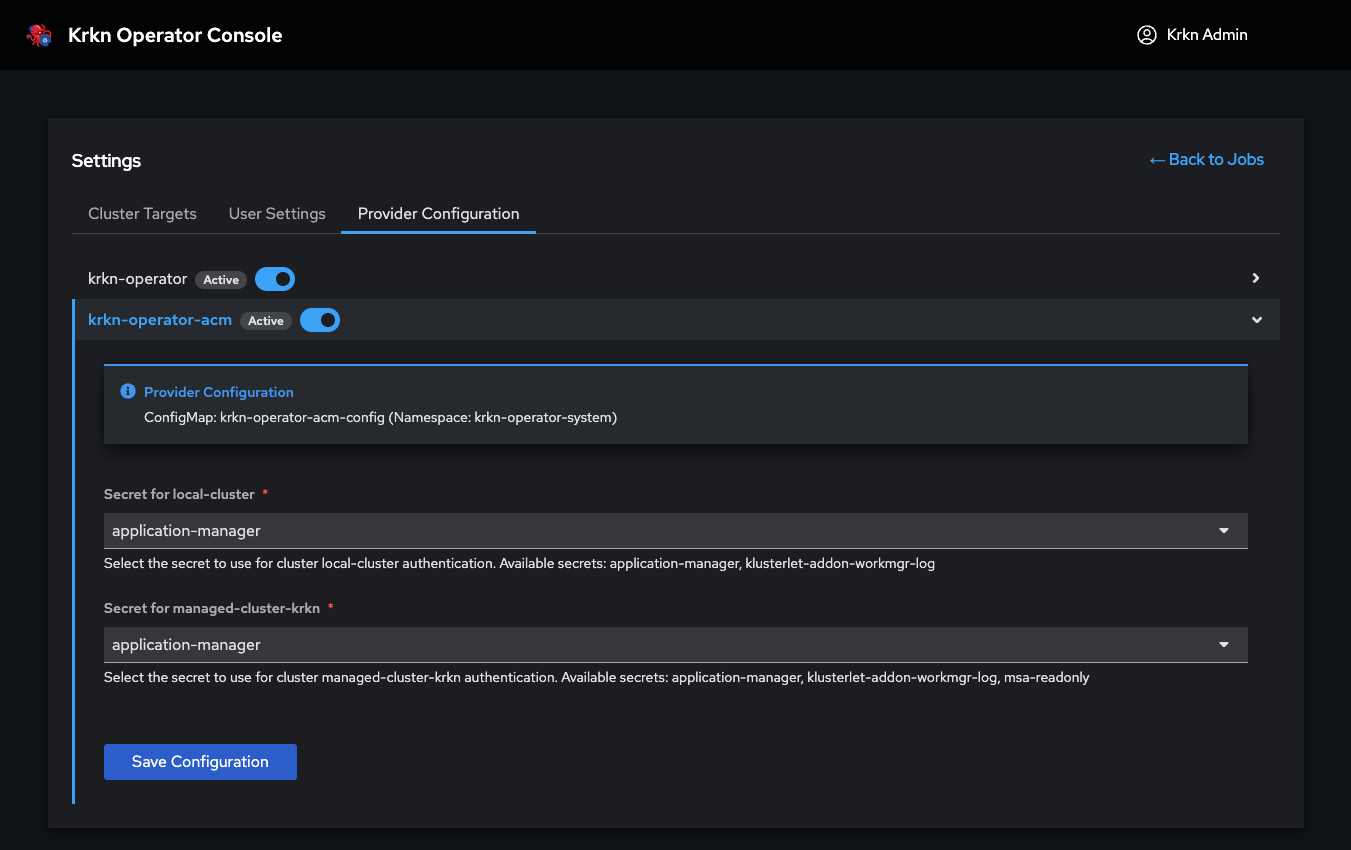
For each managed cluster, you can:
- Select a ManagedServiceAccount: Choose from existing ManagedServiceAccounts created on that cluster
- Customize permissions per cluster: Each cluster can use a different service account with different RBAC permissions
- Apply the configuration: The Krkn Operator will use this service account for all chaos testing operations on that cluster
Why Use Custom ManagedServiceAccounts?
By default, ACM uses the open-cluster-management-agent-addon-application-manager service account, which has cluster-admin privileges on all spoke clusters. While convenient, this violates the principle of least privilege.
Using custom ManagedServiceAccounts provides:
Enhanced Security:
- Least privilege access: Grant only the permissions needed for chaos testing (e.g., pod deletion, network policy creation) rather than full cluster-admin
- Per-cluster customization: Production clusters can have more restrictive permissions than dev/test clusters
- Audit trail: Each cluster has a dedicated service account, making it easier to track and audit chaos testing activities
Flexibility:
- Environment-specific policies: Different permissions for prod, staging, and dev environments
- Scenario-specific accounts: Create different service accounts for different types of chaos scenarios
- Compliance: Meet security and compliance requirements by limiting operator privileges
Example: Creating a Custom ManagedServiceAccount
Create a ManagedServiceAccount with limited chaos testing permissions:
apiVersion: authentication.open-cluster-management.io/v1beta1
kind: ManagedServiceAccount
metadata:
  name: krkn-chaos-operator
  namespace: cluster-prod-us-east  # ManagedCluster namespace
spec:
  rotation: {}
---
apiVersion: rbac.authorization.k8s.io/v1
kind: ClusterRole
metadata:
  name: krkn-chaos-limited
rules:
# Pod chaos - read and delete only
- apiGroups: [""]
  resources: ["pods"]
  verbs: ["get", "list", "watch", "delete"]

# Node chaos - read and cordon/drain only
- apiGroups: [""]
  resources: ["nodes"]
  verbs: ["get", "list", "watch", "update", "patch"]

# Network policies - create and delete
- apiGroups: ["networking.k8s.io"]
  resources: ["networkpolicies"]
  verbs: ["get", "list", "create", "delete"]

# No destructive operations on critical resources
# (no namespace deletion, no service account manipulation, etc.)
---
apiVersion: rbac.authorization.k8s.io/v1
kind: ClusterRoleBinding
metadata:
  name: krkn-chaos-limited-binding
roleRef:
  apiGroup: rbac.authorization.k8s.io
  kind: ClusterRole
  name: krkn-chaos-limited
subjects:
- kind: ServiceAccount
  name: krkn-chaos-operator
  namespace: open-cluster-management-agent-addon
Apply this to the ACM hub cluster, and the ManagedServiceAccount will be created on the spoke cluster automatically. You can then select it in the Provider Configuration UI.
Security Best Practice: Create different ManagedServiceAccounts for different environments. For example:
krkn-prodwith minimal permissions (only non-destructive scenarios)krkn-stagingwith moderate permissions (most scenarios)krkn-devwith full chaos permissions (all scenarios)
Automatic Cluster Synchronization
Once ACM integration is enabled and configured, the Krkn Operator automatically:
- Syncs cluster list every 60 seconds (configurable)
- Adds new clusters as they’re imported into ACM
- Removes clusters that are deleted from ACM
- Updates cluster status based on ACM health checks
- Rotates credentials automatically when ManagedServiceAccount tokens are refreshed
You can view all ACM-discovered clusters in the Cluster Targets page. They will be marked with an ACM badge to distinguish them from manually configured clusters.
Troubleshooting ACM Integration
ACM Component Not Starting
If the ACM component fails to start, check:
# Check pod status
kubectl get pods -n krkn-operator-system -l app.kubernetes.io/component=acm

# View logs
kubectl logs -n krkn-operator-system -l app.kubernetes.io/component=acm

# Common issues:
# - ACM/OCM not installed on the hub cluster
# - Missing RBAC permissions for the operator to read ManagedCluster resources
# - Network policies blocking communication
No Clusters Discovered
If the ACM component is running but no clusters appear:
Verify ACM is managing clusters:
kubectl get managedclustersCheck if clusters are in “Ready” state:
kubectl get managedclusters -o wideReview ACM component logs for discovery errors:
kubectl logs -n krkn-operator-system -l app.kubernetes.io/component=acm | grep -i error
ManagedServiceAccount Not Working
If a cluster shows authentication errors after configuring a ManagedServiceAccount:
Verify the ManagedServiceAccount exists and is ready:
kubectl get managedserviceaccount -n <cluster-namespace>Check the ManagedServiceAccount has proper RBAC permissions on the spoke cluster
Ensure the ManagedServiceAccount token hasn’t expired
For more detailed troubleshooting, see the ACM Integration Troubleshooting Guide.
Next Steps
Now that you’ve configured your target clusters (manually or via ACM), you’re ready to run chaos scenarios:
- Create Your First Scenario - Learn how to create and execute chaos experiments
- Scenario Templates - Use pre-built scenario templates for common chaos patterns
- Best Practices Guide - Learn chaos engineering best practices