Select a release from the version selector on a Krkn Operator documentation page.
This is the multi-page printable view of this section. Click here to print.
Operator documentation versions
Archived release-specific Krkn Operator documentation.
- 1: Krkn Operator
- 1.1: Installation
- 1.2: Administration
- 1.2.1: Cluster Management
- 1.2.2: User Management
- 1.2.3: Registry Management
- 1.2.4: Provider Configuration
- 1.2.5: Elasticsearch Management
- 1.2.6: Cloud Credentials Management
- 1.2.7: Backup and Restore
- 1.3: Usage
- 1.3.1: Jobs
- 1.3.2: Cluster Terminal
- 1.3.3: Run Scenarios
- 1.3.4: Chaos Studio
- 1.3.5: File Management
- 1.4: Releases & Roadmap
- 1.5: Feedback
- 1.6: OCM/ACM Compatibility
1 - Krkn Operator
A Kubernetes-native platform for orchestrating Chaos Engineering experiments through a web interface.

Krkn Operator is a Kubernetes-native platform to deploy, configure and orchestrate Chaos Engineering experiments through a web console. Instead of manually executing scenarios, the Operator provides a complete platform to manage users, clusters, permissions and experiment execution from a single place.
Multi-Cluster Chaos Testing
Multi-cluster execution is a core capability of the platform. Every chaos scenario can target one or more clusters simultaneously, regardless of how those clusters were registered:
- Manual targets — clusters registered directly by an administrator through the web console
- OCM/ACM discovery — clusters discovered automatically through Open Cluster Management or Red Hat Advanced Cluster Management
Both methods produce the same unified cluster pool. When executing a scenario, users select any combination of available targets and the platform runs the experiment in parallel across all of them. This enables cross-environment resilience testing (dev, staging, production), regional failover validation, and multi-tenant chaos campaigns — all from a single execution.
INFO
Multi-cluster is always available. OCM/ACM integration is optional and adds automatic cluster discovery, but multi-cluster execution works identically with manually registered targets. No external cluster management platform is required.
Personas
The platform defines two roles with different access levels.
Admin
Full access to the platform. Administrators configure the infrastructure that users operate on.
- Register and remove target clusters
- Create groups with cluster access and permissions
- Create users and assign them to groups
- Configure private registries and their visibility
- Configure cloud credentials and their visibility
- Configure target providers (e.g. ACM integration)
- All operational features available to users
User
Operational access scoped by group membership. Every user must belong to a group — the group determines which clusters, registries, credentials and features are accessible.
- View and manage jobs (based on View/Cancel permissions)
- Use the cluster terminal (requires Run permission)
- Run scenarios on assigned clusters (requires Run permission)
- Design workflows in Chaos Studio (requires Run permission)
- Upload and manage files (scoped by group visibility)
- Select cloud credentials available to their group when running cloud scenarios
INFO
Users only see jobs from their own group. A cluster-wide indicator shows the names of running scenarios across all groups, but no details.
Permission Model
        Admin
          │
    Creates Groups
          │
    ┌─────┴──────┐
    │             │
  Group A      Group B
    │             │
  Clusters     Clusters
  Permissions  Permissions
  (View,Run,   (View)
   Cancel)
    │             │
  Users        Users
Permissions are assigned at the group level and determine what users can do on clusters accessible to their group.
View
View
Allows users to see jobs and their execution results. Users with this permission can inspect single run outcomes, console logs, graph run nodes, and Resiliency Scores — but cannot execute, cancel or remove anything.
Applies to: Jobs
Run
Run
Allows users to execute chaos experiments on the clusters assigned to their group. This includes running single scenarios, designing and executing Chaos Studio workflows, and accessing the cluster terminal for read-only inspection.
Applies to: Run Scenarios · Chaos Studio · Cluster Terminal
Cancel
Cancel
Allows users to cancel running scenarios and to remove scenario runs and their execution history. Without this permission, jobs remain visible but cannot be cancelled or removed.
Applies to: Jobs
Key Capabilities
| Capability | Description |
|---|---|
| Cluster Management | Register and manage target Kubernetes clusters |
| User & Group Management | Organize users through groups with granular permissions |
| Private Registries | Configure private container registries with group-based visibility |
| Cloud Credentials | Save cloud provider credentials and inject them into scenario pods via SecretKeyRef |
| Chaos Studio | Design reusable visual workflows with serial and parallel execution |
| Multi-cluster Execution | Run experiments on one or more clusters simultaneously |
| Resiliency Score | Measure application resilience using PromQL-based metrics |
| Jobs | Monitor experiment progress and inspect execution logs |
| Cluster Terminal | Explore managed clusters using read-only kubectl and oc commands |
| File Management | Store reusable configuration files and PromQL queries |
| Provider Configuration | Configure target providers (ACM/OCM integration) |
Compatibility
- Kubernetes
- OpenShift
- Open Cluster Management (OCM)
- Red Hat Advanced Cluster Management (ACM)
See the Compatibility Matrix for tested ACM/OCM versions and platform details.
Next Steps
- Installation — Deploy Krkn Operator with Helm
- Administration — Configure clusters, users, registries, credentials and providers
- Usage — Run scenarios, use Chaos Studio, manage jobs
- Compatibility Matrix — Supported platforms and ACM/OCM versions
1.1 - Installation
Install Krkn Operator using Helm

Installation Admin
Deploy Krkn Operator on Kubernetes or OpenShift using Helm.
This walkthrough is retained with v1.0.0 documentation and may show an earlier interface.
Prerequisites
- Kubernetes 1.19+ or OpenShift 4.x
- Helm 3.0+
Quick Start
Helm chart version for this release: 1.0.0
helm install krkn-operator oci://quay.io/krkn-chaos/charts/krkn-operator \
  --version 1.0.0 \
  --namespace krkn-operator-system \
  --create-namespace
Verify:
kubectl get pods -n krkn-operator-system -l app.kubernetes.io/name=krkn-operator
Access the console (local):
kubectl port-forward -n krkn-operator-system svc/krkn-operator-console 3000:3000
Production Installation
Choose the method that matches your environment:
| Method | External Access |
|---|---|
| Kubernetes | Gateway API (recommended) or Ingress |
| OpenShift | Routes (native) |
Install with a custom values.yaml:
helm install krkn-operator oci://quay.io/krkn-chaos/charts/krkn-operator \
  --version 1.0.0 \
  --namespace krkn-operator-system \
  --create-namespace \
  -f values.yaml
Kubernetes with Gateway API
console:
  enabled: true
  gateway:
    enabled: true
    gatewayName: krkn-gateway
    hostname: krkn.example.com
    path: /
    pathType: PathPrefix
Kubernetes with Ingress
console:
  enabled: true
  ingress:
    enabled: true
    className: nginx
    hostname: krkn.example.com
    tls:
      - secretName: krkn-tls
        hosts:
          - krkn.example.com
OpenShift with Routes
console:
  enabled: true
  route:
    enabled: true
    hostname: krkn.apps.cluster.example.com
    tls:
      enabled: true
      termination: edge
      insecureEdgeTerminationPolicy: Redirect
INFO
OpenShift Security: The chart automatically detects OpenShift and configures the required Security Context Constraints (SCC). No manual SCC configuration is needed.
OCM/ACM Integration
Enable automatic cluster discovery through Open Cluster Management (OCM) or Red Hat Advanced Cluster Management (ACM):
See the OCM/ACM Compatibility page for tested versions.
helm install krkn-operator oci://quay.io/krkn-chaos/charts/krkn-operator \
  --version 1.0.0 \
  --namespace krkn-operator-system \
  --create-namespace \
  --set acm.enabled=true
Upgrade
helm upgrade krkn-operator oci://quay.io/krkn-chaos/charts/krkn-operator \
  --version 1.0.0 \
  --namespace krkn-operator-system \
  -f values.yaml
Uninstall
helm uninstall krkn-operator --namespace krkn-operator-system
INFO
CRDs are preserved after uninstall to prevent data loss. To remove them manually:
kubectl delete crds -l app.kubernetes.io/name=krkn-operator
Complete values.yaml Reference
Click to expand the full values.yaml reference
namespaceOverride: ""

operator:
  image: quay.io/krkn-chaos/krkn-operator:latest
  pullPolicy: IfNotPresent
  enabled: true
  replicaCount: 1
  resources:
    requests:
      cpu: 100m
      memory: 128Mi
    limits:
      cpu: 500m
      memory: 512Mi
  dataProvider:
    resources:
      requests:
        cpu: 50m
        memory: 64Mi
      limits:
        cpu: 200m
        memory: 256Mi
  service:
    type: ClusterIP
    port: 8080
    grpcPort: 50051
  logging:
    level: info
    format: json
  securityContext:
    runAsNonRoot: true
    seccompProfile:
      type: RuntimeDefault
  nodeSelector: {}
  tolerations: []
  affinity: {}
  extraEnv: []

dataProvider:
  image: quay.io/krkn-chaos/data-provider:latest

acm:
  enabled: false
  image: quay.io/krkn-chaos/krkn-operator-acm:latest
  replicaCount: 1
  config:
    secretName: "application-manager"
  service:
    port: 8080
    grpcPort: 50051
  logging:
    level: info
    format: json
  securityContext:
    runAsNonRoot: true
    seccompProfile:
      type: RuntimeDefault
  resources:
    requests:
      cpu: 100m
      memory: 128Mi
    limits:
      cpu: 200m
      memory: 256Mi
  nodeSelector: {}
  tolerations: []
  affinity: {}

console:
  enabled: true
  image: quay.io/krkn-chaos/console:latest
  replicaCount: 1
  service:
    type: ClusterIP
    port: 3000
    nodePort: null
  ingress:
    enabled: false
    className: nginx
    hostname: krkn.example.com
    annotations: {}
    tls: []
  gateway:
    enabled: false
    gatewayName: krkn-gateway
    gatewayNamespace: ""
    sectionName: ""
    hostname: krkn.example.com
    path: /
    pathType: PathPrefix
    annotations: {}
  route:
    enabled: false
    hostname: ""
    tls:
      termination: edge
  resources:
    requests:
      cpu: 50m
      memory: 64Mi
    limits:
      cpu: 200m
      memory: 256Mi
  securityContext:
    runAsNonRoot: true
    seccompProfile:
      type: RuntimeDefault
  nodeSelector: {}
  tolerations: []
  affinity: {}

pullSecrets: []

auth:
  jwtSecret: ""
  jwtExpiryHours: 24

rbac:
  create: true

serviceAccount:
  create: true
  name: ""
  annotations: {}

crds:
  keep: true

monitoring:
  enabled: false
  service:
    port: 8443
  serviceMonitor:
    enabled: false
    interval: 30s

networkPolicy:
  enabled: false
  ingress: []
  egress: []

updateStrategy:
  type: RollingUpdate

podDisruptionBudget:
  enabled: false
  minAvailable: 1

commonLabels: {}
commonAnnotations: {}
nameOverride: ""
fullnameOverride: ""
1.2 - Administration
Platform administration for Krkn Operator
Administration Admin
Administrators configure the platform infrastructure that users operate on. This includes registering clusters, managing users and groups, setting up private registries, cloud credentials, observability endpoints and target providers.
Permission Model
The Admin creates groups that define what users can do on the platform. Each group specifies:
- Which clusters are accessible
- Which permissions are granted (View, Run, Cancel)
- Which registries and cloud credentials are visible
Users inherit all permissions from their assigned group.
Admin creates Group
      │
      ├── Assigns Clusters (target-1, target-2, ...)
      ├── Assigns Permissions (View, Run, Cancel)
      ├── Assigns Registry Visibility
      └── Assigns Cloud Credential Visibility
            │
            └── Users in this group inherit everything
INFO
Every user must belong to a group. A user without a group has no access to the platform.
Admin Features
| Feature | Description |
|---|---|
| Cluster Management | Register and remove target Kubernetes clusters |
| User Management | Create groups and users, assign permissions |
| Registry Management | Configure private container registries and visibility |
| Provider Configuration | Configure target providers (ACM integration) |
| Elasticsearch Management | Configure saved Elasticsearch endpoints for observability |
| Cloud Credentials Management | Configure saved cloud provider credentials for scenario injection |
| Backup and Restore | Back up and restore operator configuration state |
1.2.1 - Cluster Management
Register and manage target Kubernetes clusters
Cluster Management Admin
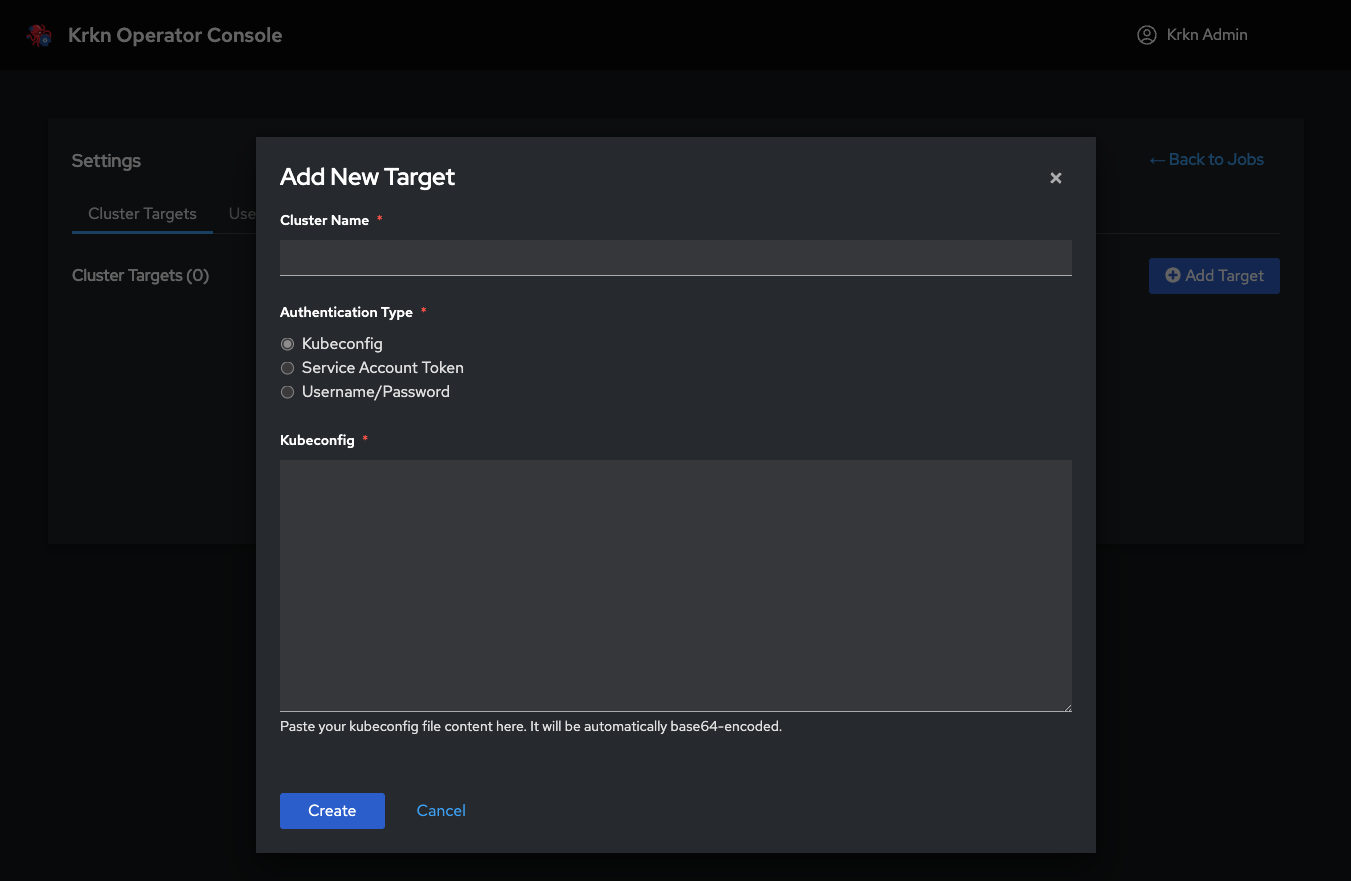
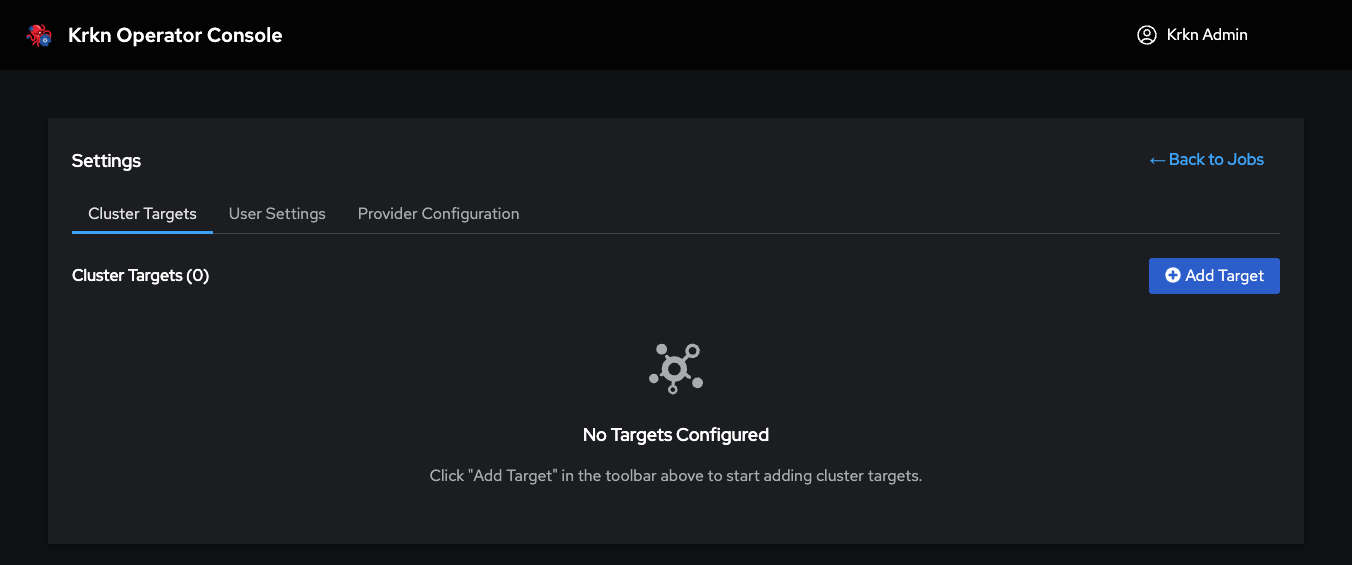
Register target Kubernetes clusters that will be available for chaos scenario execution. The operator runs on a control plane cluster and executes scenarios against registered targets — it never runs chaos against itself.
This walkthrough is retained with v1.0.0 documentation and may show an earlier interface.
Operations
| Operation | Description |
|---|---|
| Add Cluster | Register a new target cluster by providing its name and kubeconfig |
| View Clusters | Browse all registered clusters and their status |
| Delete Cluster | Remove a cluster from the platform |
Once registered, clusters become available for assignment to groups through User Management.
1.2.2 - User Management
Manage groups and users on the platform
User Management Admin
Organize users through groups that define cluster access and permissions. The group is the central unit of the permission model — users inherit all capabilities from their assigned group.
This walkthrough is retained with v1.0.0 documentation and may show an earlier interface.
Groups
A group defines what its members can access and do on the platform.
| Field | Description |
|---|---|
| Name | Group identifier |
| Description | Purpose of the group |
| Cluster Permissions | Which registered clusters this group can target |
Groups also receive permission flags that control what operations their members can perform:
| Permission | What it grants |
|---|---|
| View | View jobs and execution results |
| Run | Execute scenarios, use Chaos Studio, access cluster terminal |
| Cancel | Cancel running jobs, and remove jobs and execution history |
Users
Users are created and assigned to a group during creation.
| Field | Description |
|---|---|
| User Data | Username, credentials |
| Group | The group this user belongs to |
INFO
Group assignment is mandatory. Every user must belong to exactly one group. A user cannot be created without selecting a group. The group determines which clusters the user can target and which operations they can perform.
Permission Cascade
Group "SRE Team"
  ├── Clusters: production-us, production-eu
  ├── Permissions: View, Run
  └── Members: alice, bob
        │
        ├── alice → can run scenarios on production-us, production-eu
        └── bob   → can run scenarios on production-us, production-eu
1.2.3 - Registry Management
Configure private container registries and visibility
Registry Management Admin
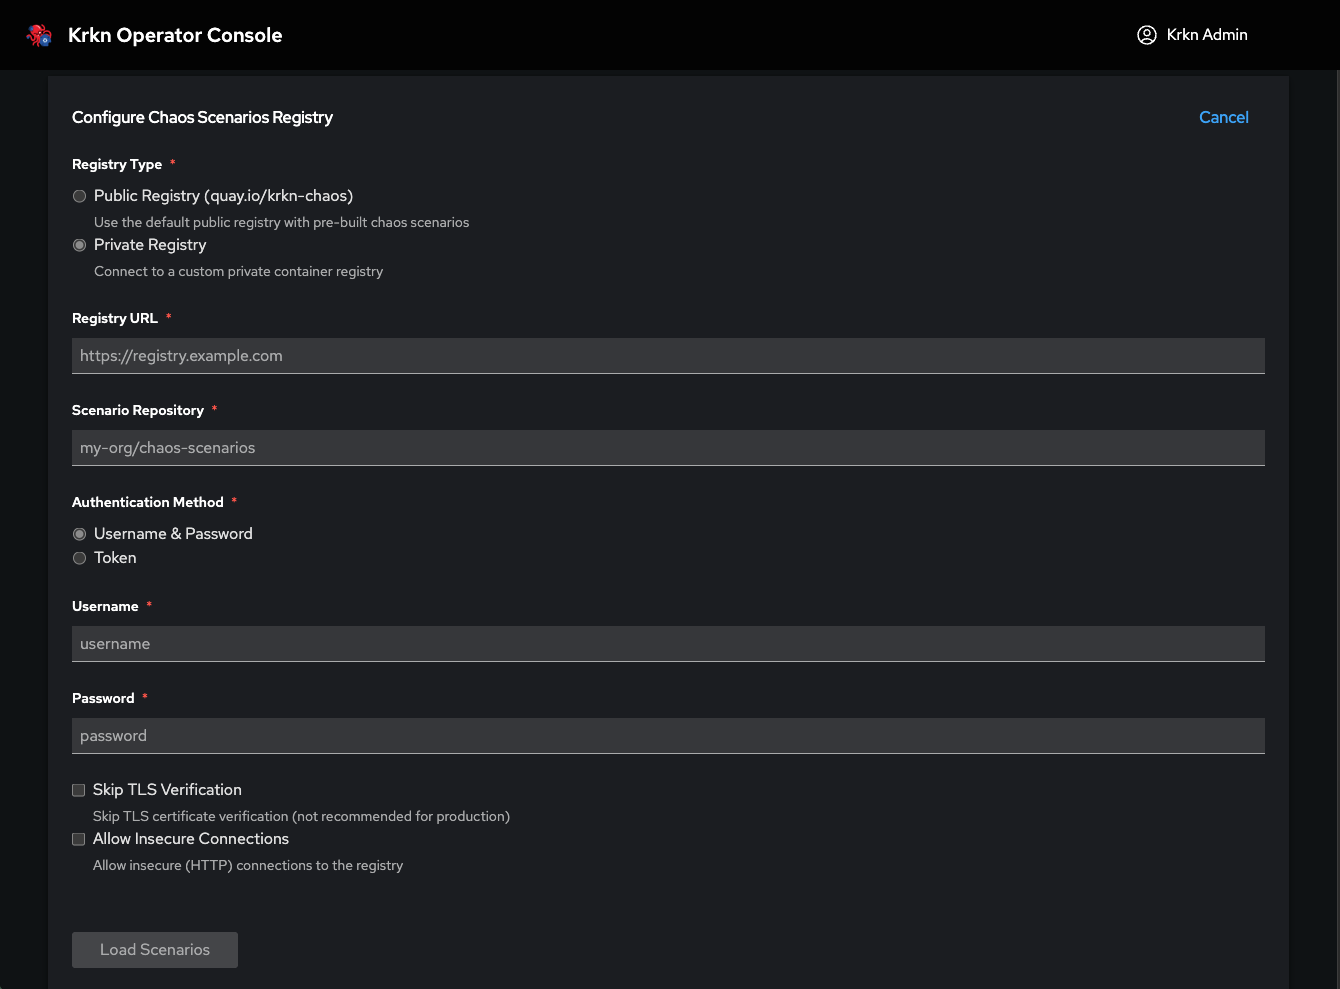
Configure private container registries for chaos scenario images and control which groups can access them. By default, scenarios are pulled from the public Quay.io registry. Private registries enable air-gapped deployments and custom scenario images.
This walkthrough is retained with v1.0.0 documentation and may show an earlier interface.
Creating a Private Registry
Configure a private registry by providing its connection settings (URL, credentials, TLS configuration).
Visibility
Each registry has a visibility setting that controls who can use it:
| Visibility | Description |
|---|---|
| Everyone | All users on the platform can select this registry |
| Group-based | Only users belonging to assigned groups can see and use this registry |
Impact on Scenario Selection
When a user selects a private registry during scenario execution, only the scenarios that have been mirrored to that registry will be available. Scenarios not present in the private registry will not appear in the selection list.
INFO
Air-Gapped Environments: The operator uses OCI registry APIs for scenario metadata. A private registry configuration allows the platform to function completely in disconnected environments without external connectivity.
1.2.4 - Provider Configuration
Configure target providers for cluster discovery
Provider Configuration Admin
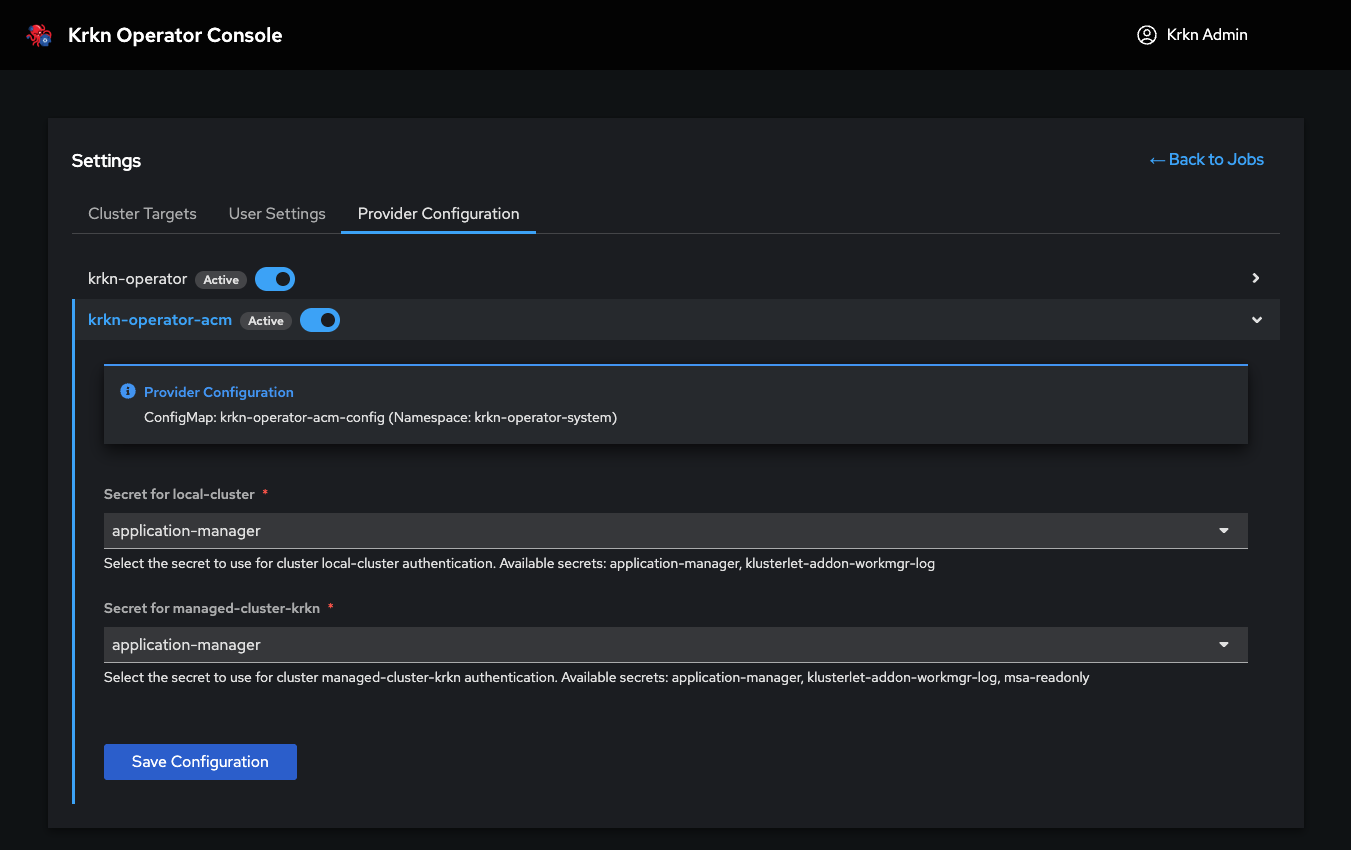
Configure target providers that integrate with external cluster management platforms. The provider configuration interface adapts dynamically based on the selected provider.
This walkthrough is retained with v1.0.0 documentation and may show an earlier interface.
Supported Providers
| Provider | Description |
|---|---|
| ACM / OCM | Automatically discover and synchronize managed Kubernetes clusters through Red Hat Advanced Cluster Management or Open Cluster Management |
INFO
The provider configuration interface is designed to be extensible. As new integration operators are developed, their configuration panels will appear automatically in this section.
Cloud Provider Configuration
Some chaos scenarios interact directly with cloud infrastructure and require cloud provider credentials (AWS, GCP, Azure, OpenStack, etc.) to perform node-level operations. The following scenarios are not currently available in Krkn Operator until cloud provider configuration support is added:
| Scenario | Why Cloud Provider Is Required |
|---|---|
| node-scenarios | Stops, terminates, or reboots nodes via the cloud provider API |
| node-scenarios-bm | Controls bare metal nodes via BMC/IPMI credentials |
| power-outages | Shuts down and restarts the entire cluster through the cloud provider |
| zone-outages | Simulates availability zone failures by manipulating cloud network resources |
INFO
Cloud provider configuration is not yet supported in Krkn Operator. The scenarios above cannot be executed until cloud provider credential management is introduced. This page will be updated when that support becomes available.
1.2.5 - Elasticsearch Management
Configure saved Elasticsearch endpoints for platform-wide observability
Elasticsearch Management Admin
Administrators can configure and save Elasticsearch endpoints that users can reference when executing chaos scenarios. This enables centralized observability configuration without requiring users to manually enter connection details.
Overview
Elasticsearch integration allows krkn scenarios to index execution metrics, logs, and telemetry data for analysis and historical tracking. Instead of requiring each user to configure Elasticsearch details manually, admins can:
- Pre-configure Elasticsearch endpoints with connection details
- Save named configurations for reuse across all scenarios
- Control which Elasticsearch endpoints are available platform-wide
Users can then select from the saved Elasticsearch configurations when setting global parameters during scenario execution.
INFO
Users can select saved Elasticsearch configurations but cannot add new ones. Only admins have permission to create, edit, or delete Elasticsearch endpoints.
Adding an Elasticsearch Endpoint
- Navigate to Administration > Elasticsearch Management
- Click Add Elasticsearch
- Configure the following details:
| Field | Description | Required |
|---|---|---|
| Name | Friendly name for this configuration (e.g., “Production ES”, “Dev Cluster”) | Yes |
| URL | Elasticsearch endpoint URL (e.g., https://elasticsearch.example.com:9200) | Yes |
| Index | Index name or pattern for storing krkn data (e.g., krkn-chaos-*) | Yes |
| Username | Authentication username (if required) | No |
| Password | Authentication password (if required) | No |
| Verify SSL | Whether to verify SSL certificates (toggle) | Yes |
- Click Save to add the configuration to the saved list
Managing Saved Configurations
View Saved Elasticsearch Endpoints
The Elasticsearch Management page displays all saved configurations:
- Name: Friendly identifier shown to users
- URL: Elasticsearch endpoint
- Index: Target index pattern
- Actions: Edit or Delete options
Edit an Endpoint
- Click the Edit icon next to the saved configuration
- Modify any field (Name, URL, Index, credentials, SSL verification)
- Click Save to update
INFO
Editing a saved Elasticsearch configuration affects all scenarios currently using it. Changes apply to future scenario executions immediately.
Delete an Endpoint
- Click the Delete icon next to the saved configuration
- Confirm the deletion
INFO
Deleting an Elasticsearch configuration does not affect running scenarios, but it will no longer be available for selection in new scenario executions.
How Users Select Elasticsearch
When users configure global parameters for a scenario or workflow, they can:
- Expand the Global parameters section
- Locate the Elasticsearch parameter
- Click the dropdown to view all saved Elasticsearch configurations
- Select an Elasticsearch endpoint by name (e.g., “Production ES”)
The selected configuration automatically applies the admin-defined connection details (URL, index, credentials) to the scenario execution.
Users cannot:
- Add new Elasticsearch endpoints from the scenario configuration interface
- Edit existing saved configurations
- View sensitive details like passwords (only admins can see/edit credentials)
Users can:
- Choose from the dropdown list of saved Elasticsearch endpoints
- Opt not to use Elasticsearch (by leaving the parameter unset)
Best Practices
Naming Conventions
Use descriptive names that indicate the purpose or environment:
- ✅
Production Observability - ✅
Staging Metrics - ✅
Dev Team Shared ES - ❌
ES1,Elasticsearch,Test
Security
- Use dedicated credentials for krkn with limited write permissions to specific indices
- Enable SSL verification for production endpoints
- Restrict index patterns to prevent accidental data overwrites (e.g.,
krkn-*not*)
Index Patterns
Use time-based or scenario-based index naming:
krkn-chaos-{YYYY-MM-DD}— daily indices for easy retention managementkrkn-scenarios-*— scenario-specific index patternkrkn-{environment}-*— environment-specific indices
INFO
Configure Elasticsearch Index Lifecycle Management (ILM) to automatically manage data retention for krkn indices.
Verification
After adding an Elasticsearch endpoint, verify it works:
- Run a simple chaos scenario with the Run Scenarios feature
- Select the saved Elasticsearch configuration in Global parameters
- Execute the scenario
- Check the Elasticsearch index for new documents:
curl -X GET "https://elasticsearch.example.com:9200/krkn-chaos-*/_search?pretty" \
  -u username:password
Successful indexing confirms the configuration is correct and accessible from the krkn-operator platform.
1.2.6 - Cloud Credentials Management
Configure saved cloud provider credentials for chaos scenario injection
Cloud Credentials Management Admin
Administrators can configure and save cloud provider credentials that users select when running cloud-dependent chaos scenarios. Credentials are stored as Kubernetes Secrets and injected into scenario pods via SecretKeyRef — plaintext cloud secrets never appear in the Custom Resource or pod environment values.
Overview
Many krkn scenarios need cloud API access (for example node stop/start, zone outages, or power outages). Instead of asking every user to paste access keys into scenario parameters, admins can:
- Pre-configure named credentials for each supported cloud provider
- Control visibility so credentials are available to everyone or only to selected groups
- Reuse the same credential across single runs and Chaos Studio workflows
Users then select a saved credential when configuring a scenario. Matching cloud parameter fields are filled from the Secret and locked in the UI.
INFO
Users can select saved cloud credentials they are allowed to see, but cannot create, edit, or delete them. Only admins manage credentials.
Supported Providers
| Provider | Typical use |
|---|---|
| AWS | EC2 / zone / node scenarios using AWS APIs |
| GCP | GCE-backed node and zone scenarios |
| Azure | Azure node and zone scenarios |
| OpenStack | OpenStack compute outage scenarios |
| Baremetal | IPMI/BMC power and node scenarios |
| VMware | vSphere-backed node scenarios |
| IBM Cloud | IBM Cloud infrastructure scenarios |
When a credential is applied, the platform also sets CLOUD_TYPE to the value expected by krkn-hub for that provider:
| Provider | CLOUD_TYPE value |
|---|---|
| AWS | aws |
| GCP | gcp |
| Azure | azure |
| OpenStack | openstack |
| Baremetal | bm |
| VMware | vmware |
| IBM Cloud | ibmcloud |
Adding a Cloud Credential
- Navigate to Settings > Cloud Credentials
- Click Create Cloud Credential (or the add action)
- Configure the common fields, then the provider-specific fields below
- Click Save to create the credential
Common fields
| Field | Description | Required |
|---|---|---|
| Name | Unique credential name (used when users select it). Lowercase alphanumeric and hyphens | Yes |
| Provider | Cloud provider (cannot be changed after create) | Yes |
| Description | Short note for operators | No |
| Visibility | Everyone or Group-based access | Yes |
Provider-specific fields
AWS
| Field | Required |
|---|---|
| Access Key ID | Yes |
| Secret Access Key | Yes |
| Default Region | Yes |
GCP
| Field | Required |
|---|---|
| Service Account JSON (base64-encoded) | Yes |
GCP credentials are mounted into the scenario pod as a file. The operator also sets GOOGLE_APPLICATION_CREDENTIALS to that mount path.
Azure
| Field | Required |
|---|---|
| Tenant ID | Yes |
| Client ID | Yes |
| Client Secret | Yes |
| Subscription ID | Yes |
OpenStack
| Field | Required |
|---|---|
| Auth URL | Yes |
| Username | Yes |
| Password | Yes |
| Project Name | Yes |
| Domain Name | No (optional; injected only when present on the Secret) |
Baremetal (IPMI/BMC)
| Field | Required |
|---|---|
| BMC User | Yes |
| BMC Password | Yes |
| BMC Address | Yes |
VMware
| Field | Required |
|---|---|
| vSphere IP | Yes |
| vSphere Username | Yes |
| vSphere Password | Yes |
IBM Cloud
| Field | Required |
|---|---|
| IBM Cloud URL | Yes |
| API Key | Yes |
INFO
These credential names are reserved and cannot be used:
available, aws, gcp, azure, openstack, baremetal, vmware, ibmcloud.Visibility
Each credential has a visibility setting that controls who can use it:
| Visibility | Description |
|---|---|
| Everyone | All users on the platform can select this credential |
| Group-based | Only users belonging to the assigned groups can see and use this credential |
INFO
Partial updates (for example rotating a region or key) preserve existing access labels unless you explicitly change visibility or group membership.
Managing Saved Credentials
View Credentials
The Cloud Credentials page lists saved configurations with:
- Name: Identifier shown in scenario selection
- Provider: Cloud provider type
- Access: Everyone or assigned groups
- Actions: Edit or Delete
Admins can filter the list by name, provider, and access type.
Edit a Credential
- Click Edit next to the credential
- Update description, visibility, groups, or provider secret fields
- Click Save
The provider cannot be changed after creation — create a new credential if you need a different provider. Secret values are never shown after creation. Leave a secret field empty to keep the existing value; provide a new value only when rotating credentials.
INFO
Editing a saved credential affects future scenario executions that select it. Already running pods keep the Secret values they started with.
Delete a Credential
- Click Delete next to the credential
- Confirm the deletion
INFO
Deleting a credential removes it from selection for new runs. It does not cancel jobs that already started with that credential.
How Credentials Are Injected
When a run references a cloud credential:
- The console (and API) store only the credential name on the run (
cloudCredentialRef) - Cloud-related environment variables from the request are stripped so plaintext keys cannot land in the Custom Resource
- The operator loads the credential Secret and injects values into the scenario pod using
SecretKeyRef(and file mounts where required, such as GCP service-account JSON)
Users cannot:
- Create or edit credentials from the scenario wizard
- View secret values for saved credentials
- Select credentials outside their visibility (group membership)
Users can:
- Choose from the credentials available to them
- Clear the selection and enter parameters manually when no credential is needed
How Users Select Credentials
When configuring parameters for a single scenario or a Chaos Studio node:
- Open the Load Cloud Credential section (shown when the scenario has cloud-related fields)
- Select a saved credential from the dropdown (only credentials your group can access)
- Matching cloud fields become read-only and show masked placeholders (
••••••••) - Fields for other cloud providers are hidden so the form only shows the applied provider
- Continue configuring non-cloud parameters and run the scenario
In Chaos Studio, set the credential per node when configuring that node’s scenario. Each cloud-dependent node can use a different credential.
Best Practices
Naming
Use names that encode provider and environment:
- ✅
aws-prod-ci - ✅
azure-staging-sre - ✅
bmc-lab-rack-a - ❌
creds,test,key1
Access control
- Prefer group-based visibility for production credentials
- Use Everyone only for shared non-production accounts
- Rotate keys by editing the credential rather than creating duplicates with the same name
Security
- Never paste long-lived cloud secrets into scenario parameter fields when a saved credential exists
- Treat credential Secrets like any other cluster secret: limit RBAC outside the operator namespace
- Review group membership before granting access to production cloud accounts
Verification
After adding a credential, verify injection works:
- Run a cloud-dependent scenario with Run Scenarios
- Select the saved credential under Load Cloud Credential
- Confirm cloud fields are disabled and show masked placeholders
- Execute the run and confirm the job starts successfully
- Optionally inspect the scenario pod: cloud env vars should reference the credential Secret by name, not plaintext values
1.2.7 - Backup and Restore
Back up and restore Krkn Operator configuration state
Backup and Restore Admin
The Krkn Operator includes a built-in backup and restore feature accessible from the web console. Backups contain portable operator configuration for:
- Admin settings
- Cluster targets
- Users and groups
- Private registries
- Elasticsearch configuration
- Provider configuration
The backup also includes the operator-managed secrets required for these settings.
This feature is not a complete Kubernetes or cluster backup. It does not include runtime registration objects, ACM integration data, uploaded files, file metadata, or the JWT signing key.
Creating a Backup
- Navigate to the Backup & Restore card in the console.
- Click Download Backup.
- The operator creates a compressed
.tar.gzarchive and saves it to your local machine.
INFO
Security: Backup archives contain sensitive configuration data, including target connection details and operator-managed credentials. Store backups securely and restrict access to authorized administrators.
Restoring from a Backup
- Open the Backup & Restore card in the console.
- Click Upload & Restore.
- Select a previously downloaded
.tar.gzbackup archive and confirm the restore. - Monitor the restore progress from the same page.
Only one restore can run at a time. The maximum upload size is 100 MB.
The restore runs asynchronously. Existing resources are updated with the corresponding configuration from the backup, while resources that do not exist are created. Resources absent from the backup are not deleted.
After the restore completes, the operator refreshes the connectivity status of restored target clusters.
INFO
Restoring a backup changes the current operator configuration. Before restoring an older archive, create a backup of the current state.
Restore Status
Restore status is available from the same page and can be:
- In progress
- Completed
- Failed
Restore job status is held in memory and is not persisted across operator restarts.
1.3 - Usage
Operational features for running chaos experiments
Usage
The operational features of Krkn Operator are available to all users, scoped by the permissions assigned to their group. This section covers the day-to-day workflow: running scenarios, designing workflows, monitoring jobs and managing files.
Permission Summary
| Feature | Required Permission |
|---|---|
| View Jobs | View |
| Cancel Jobs | Cancel |
| Cluster Terminal | Run |
| Run Scenarios | Run |
| Chaos Studio | Run |
| File Management | Group visibility |
| Select Cloud Credentials | Group visibility (credentials managed by Admin) |
INFO
Users only see data from their own group. A cluster-wide indicator shows the names of currently running scenarios across all groups, but without details.
Features
- Jobs — Monitor and inspect scenario execution results
- Cluster Terminal — Explore target clusters with read-only commands
- Run Scenarios — Execute single chaos scenarios (including selecting saved cloud credentials)
- Chaos Studio — Design visual workflows with serial and parallel execution
- File Management — Upload and manage configuration files
Cloud credentials themselves are configured by administrators — see Cloud Credentials Management.
1.3.1 - Jobs
Monitor and inspect chaos experiment execution
Jobs View Cancel
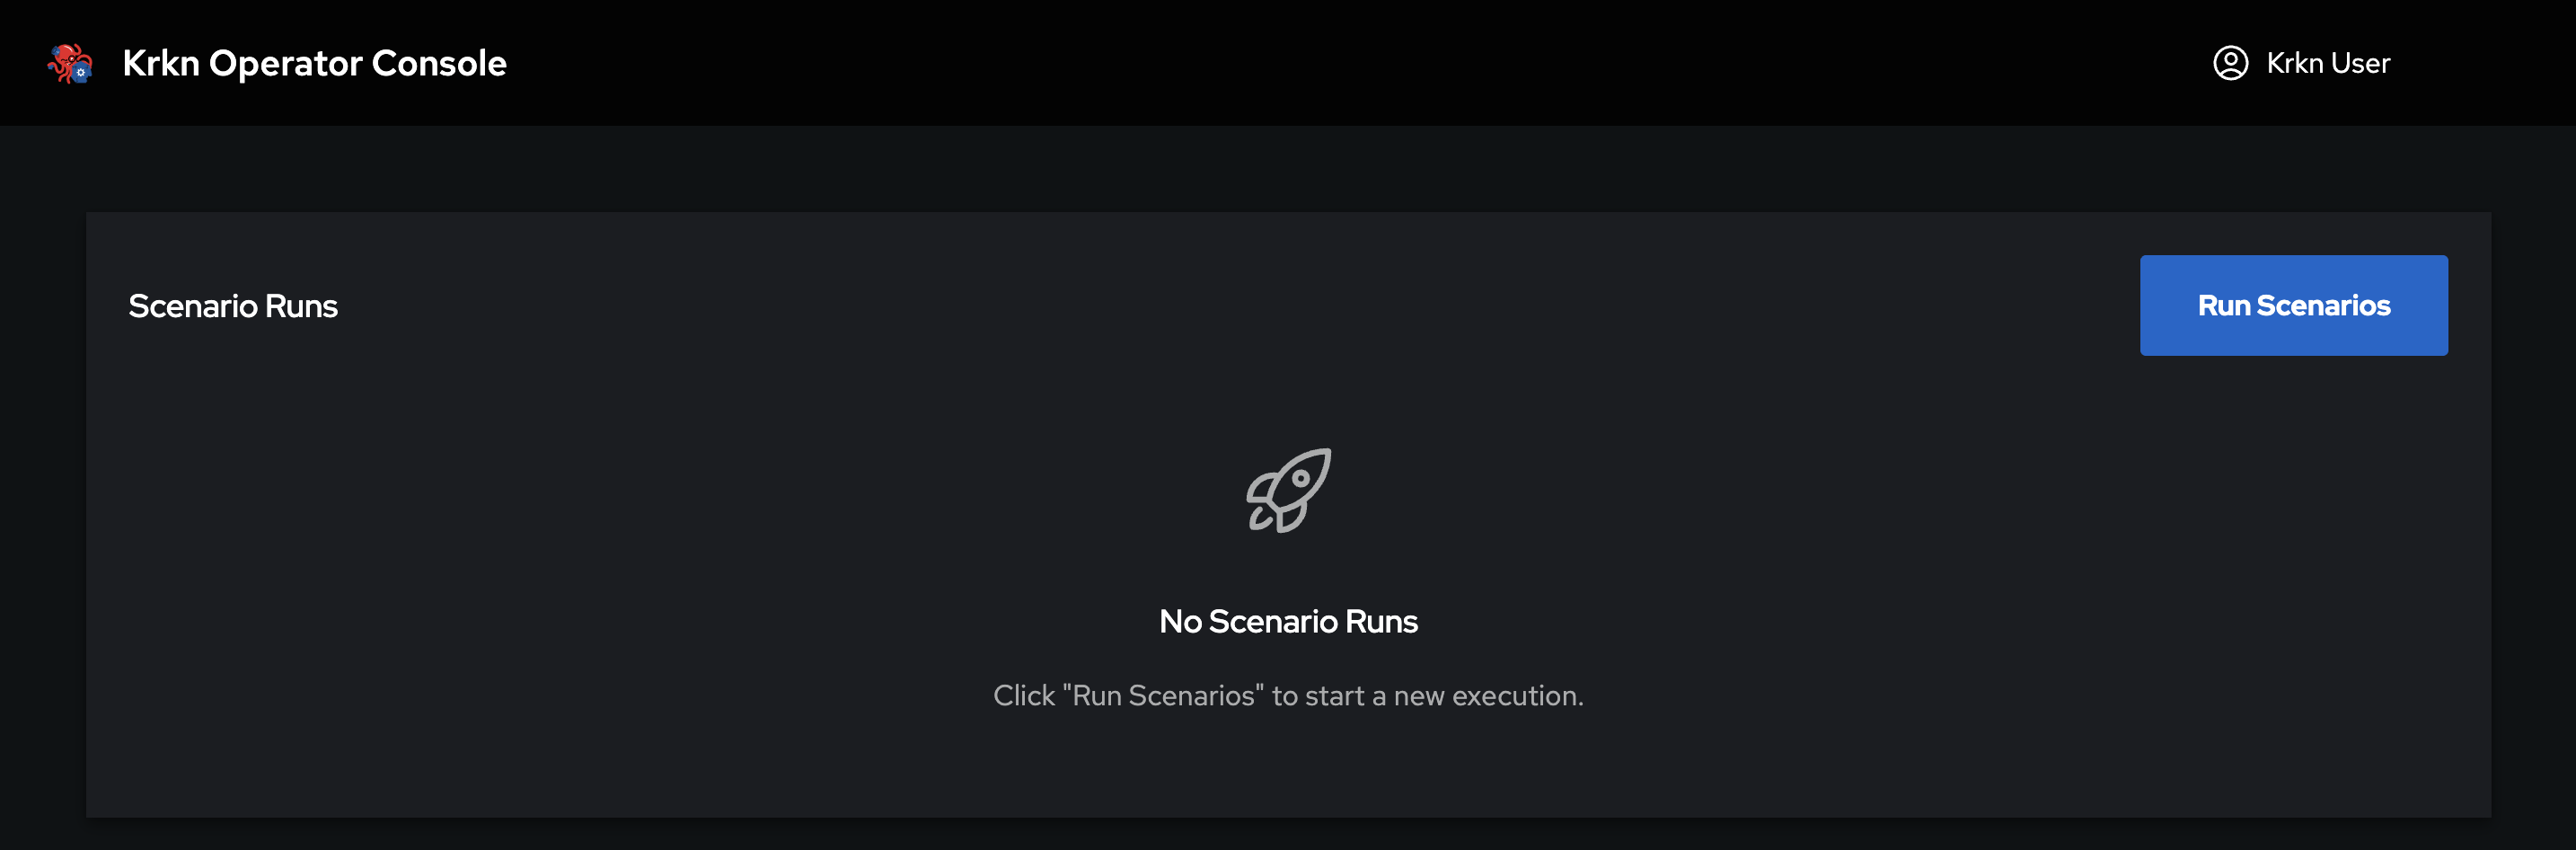
The Jobs list is the home screen of the platform. It displays all scenario executions for your group, with real-time status updates and access to logs and results.
This walkthrough is retained with v1.0.0 documentation and may show an earlier interface.
Run Types
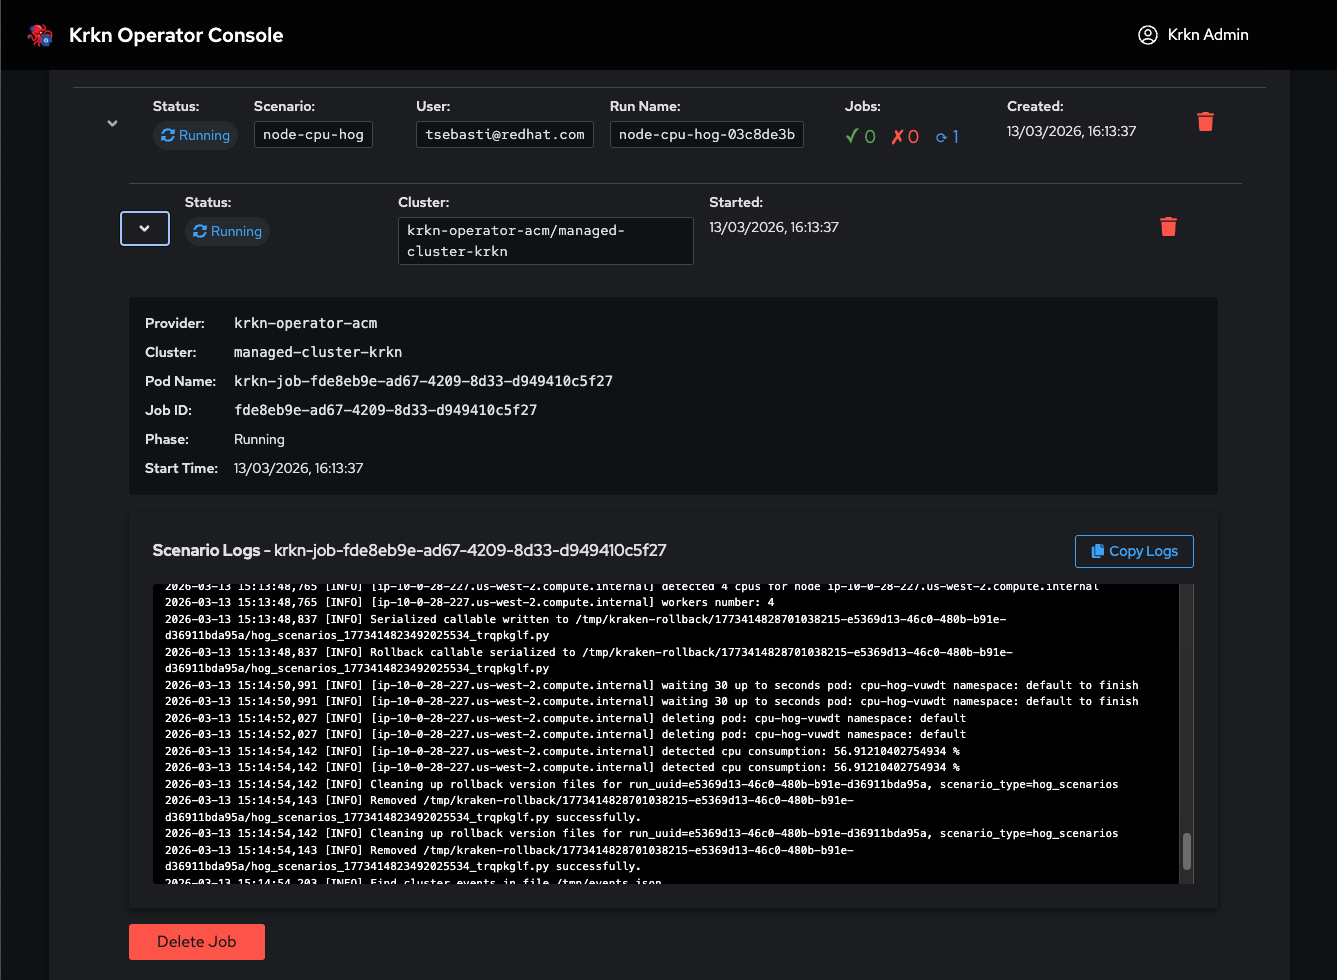
Single Run
A single scenario execution on one or more target clusters. For each run you can inspect:
- Execution outcome (success, failure)
- Console logs of the krkn pod that executed the scenario
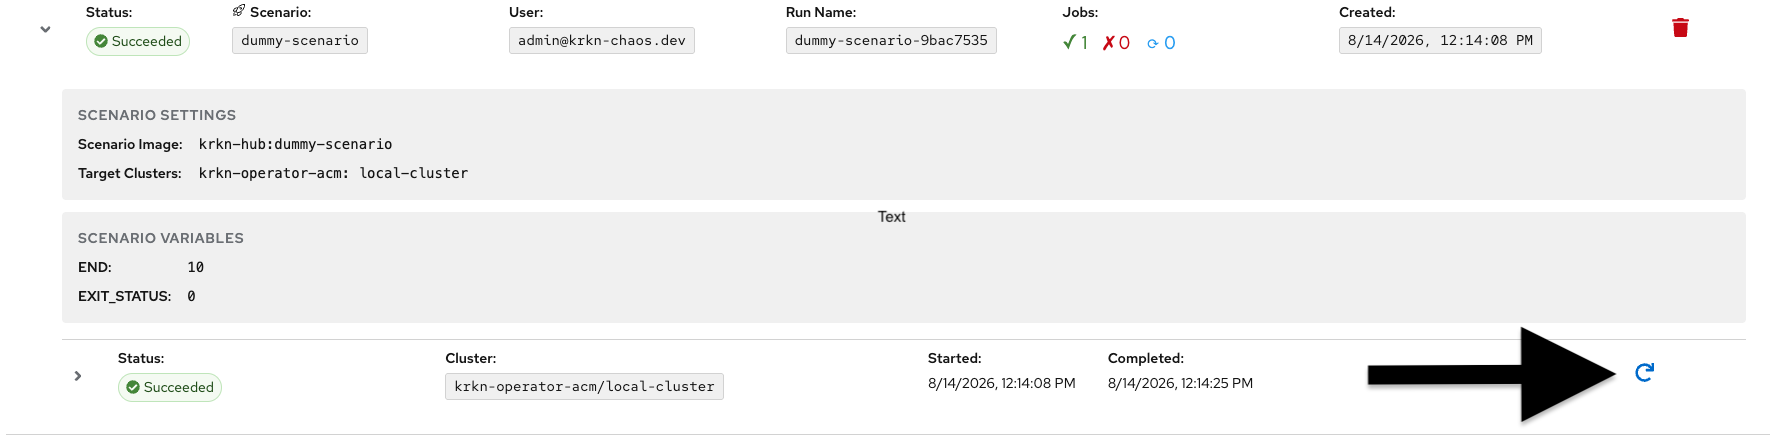
Replay & Edit
Single runs can be replayed to re-execute the same scenario with the same configuration. You can also edit the details before replaying to modify:
- Target cluster(s)
- Scenario parameters
- Configuration values
- Run Name
This allows you to quickly iterate on chaos experiments or run the same test across different environments.
Graph Run (Chaos Studio)
A workflow execution created through Chaos Studio. The execution is displayed as a graph where each node represents an individual krkn scenario. For each node you can inspect the outcome and logs independently.
Graph runs can include a Resiliency Score — a calculated metric based on PromQL queries executed during the workflow. This score measures how well the target application withstood the chaos experiment.
INFO
Resiliency Score is a key differentiating feature of Krkn Operator. It transforms chaos experiments from pass/fail tests into quantitative resilience measurements. See Chaos Studio for details on configuring it.
Visibility & Permissions
- Only jobs from your own group are displayed
- A cluster-wide tip shows the names of scenarios currently running across all groups (no details)
- Cancelling or removing jobs requires Cancel permission
1.3.2 - Cluster Terminal
Explore target clusters with read-only commands
Cluster Terminal Run
A built-in terminal for exploring target clusters using read-only oc and kubectl commands. Useful for inspecting cluster state before, during or after chaos experiments.
This walkthrough is retained with v1.0.0 documentation and may show an earlier interface.
Details
- Read-only: only read commands are available — no modifications to the cluster are possible
- Supported commands:
ocandkubectl - Target selection: only clusters accessible to your group are available
- Requires Run permission
1.3.3 - Run Scenarios
Execute single chaos scenarios on target clusters
Run Scenarios Run
Execute a chaos scenario on one or more target clusters through a guided step-by-step wizard. All scenarios can run simultaneously across multiple clusters.
This walkthrough is retained with v1.0.0 documentation and may show an earlier interface.
Execution Flow
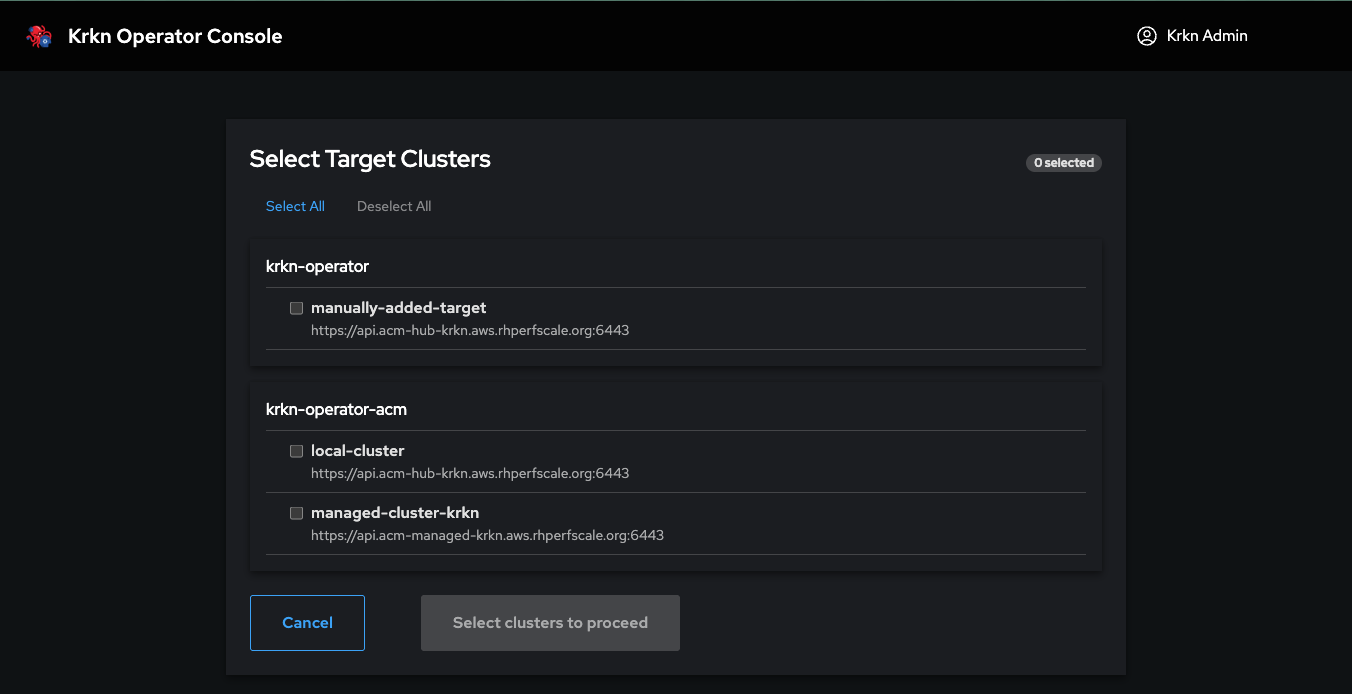
1. Select Target Clusters
Choose one or more clusters to run the scenario on. All selected clusters execute the scenario simultaneously.
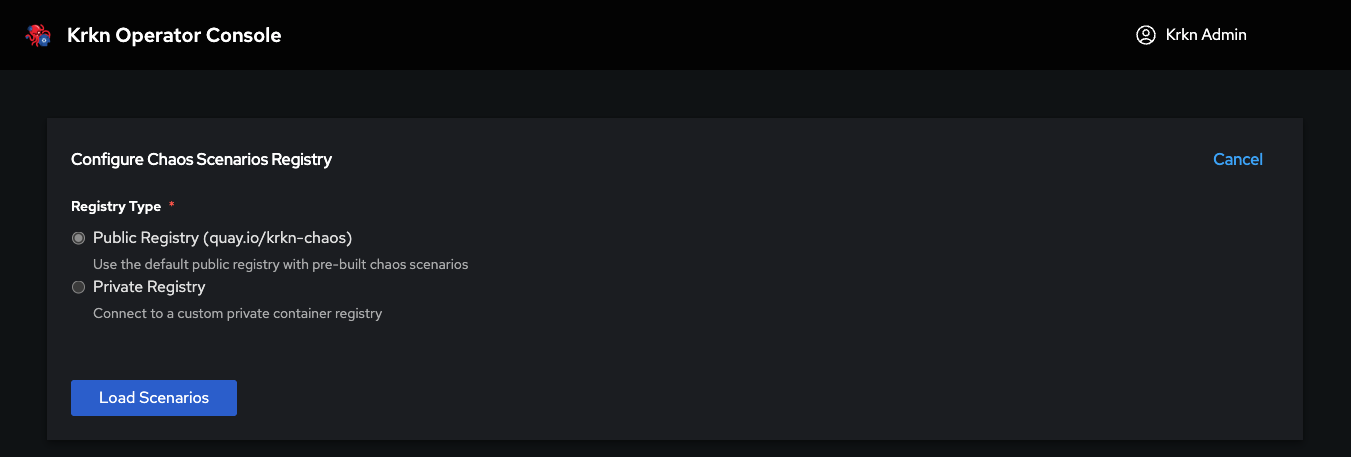
2. Select Registry
Choose the container registry for scenario images:
| Registry | Description |
|---|---|
| Public (Quay.io) | Default registry with all community scenarios |
| Private | Configured by admin, only mirrored scenarios available. Visibility controlled by group permissions |
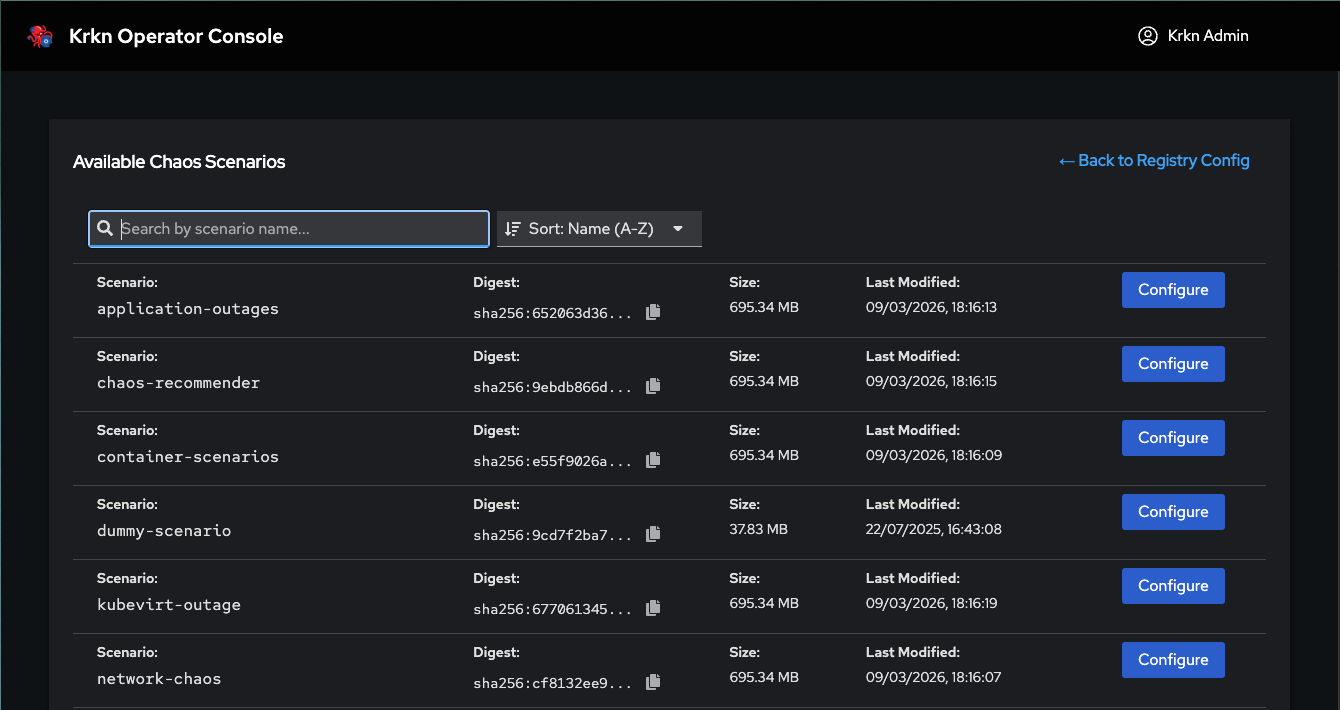
3. Select Scenario
Browse and select a chaos scenario from the chosen registry.
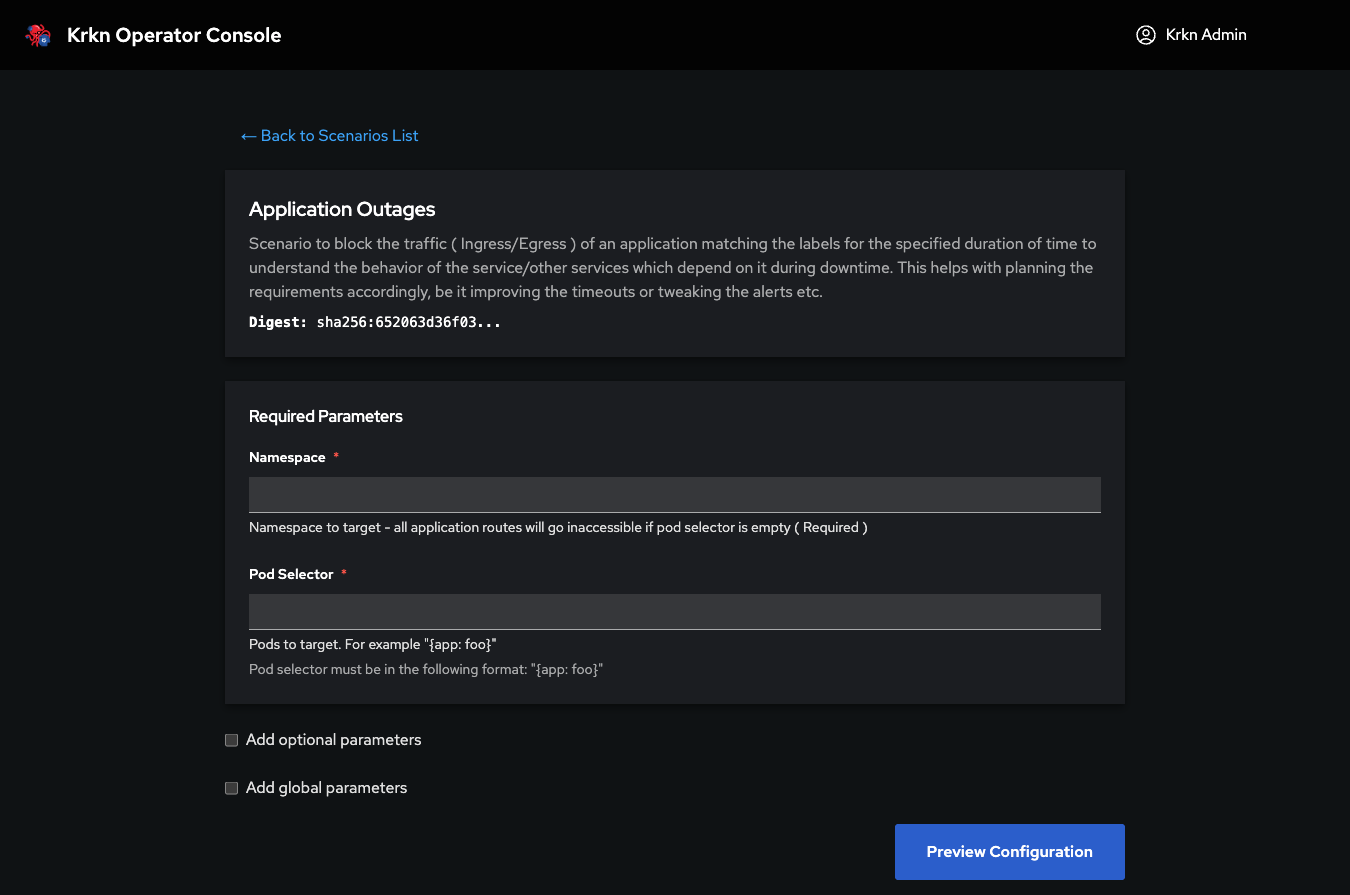
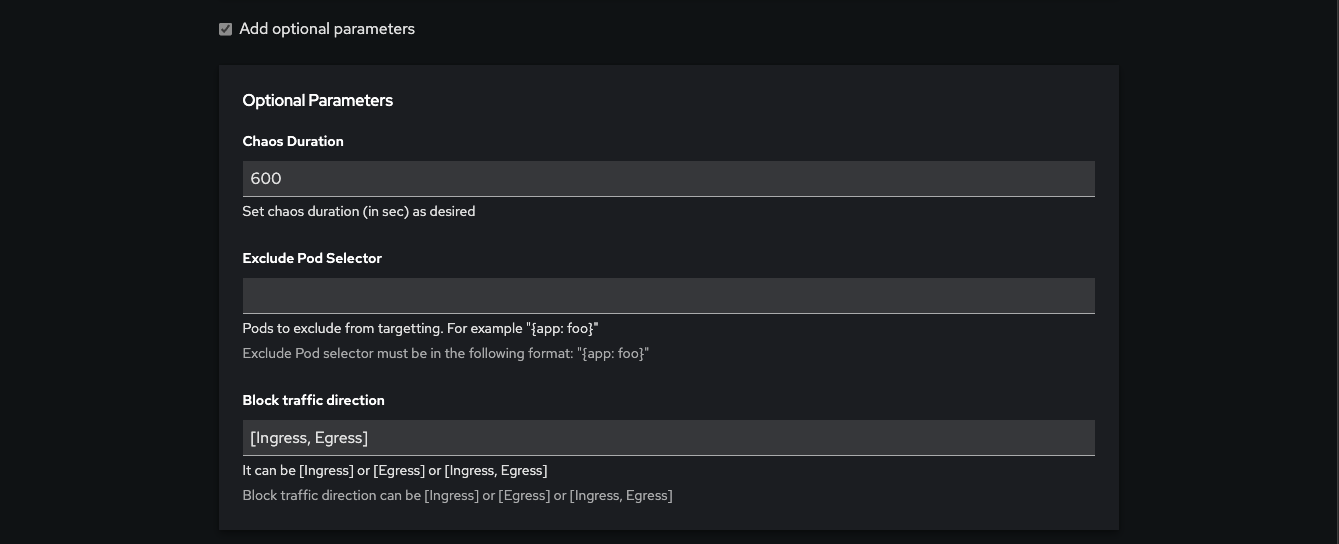
4. Configure Parameters
Each scenario defines its own parameter set, divided into three categories:
| Category | Description |
|---|---|
| Mandatory | Must be configured before execution. Not all scenarios have them |
| Optional | Fine-grained control over scenario behavior (label selectors, timing, filters) |
| Global | Framework-level settings (Elasticsearch, Prometheus, Cerberus integration). Applied only if modified from defaults |
Elasticsearch in Global Parameters
When configuring Global parameters, you can select a saved Elasticsearch endpoint to index scenario metrics and telemetry:
- Expand the Global parameters section
- Locate the Elasticsearch dropdown
- Select from available saved configurations (configured by your admin)
INFO
You can select from saved Elasticsearch configurations but cannot add new ones. Contact your administrator to add additional Elasticsearch endpoints.
Selecting an Elasticsearch configuration automatically applies connection details (URL, index, credentials) without requiring manual input.
Load Cloud Credential
When a scenario declares cloud-related fields (CLOUD_TYPE, AWS_*, AZURE_*, and similar), a Load Cloud Credential section appears:
- Open Load Cloud Credential
- Select a saved credential from the dropdown (configured by your admin)
- Matching cloud fields become read-only and show masked placeholders (
••••••••) - Fields belonging to other cloud providers are hidden from the form
- Continue configuring non-cloud parameters as usual
The dropdown only lists credentials your group can access.
INFO
You can select from saved cloud credentials but cannot create new ones. Contact your administrator to add or rotate cloud credentials.
Selecting a credential stores only the credential name on the run (cloudCredentialRef). The console and API strip plaintext cloud environment variables from the payload so they cannot land in the Custom Resource. The operator injects secret values into the scenario pod via SecretKeyRef.
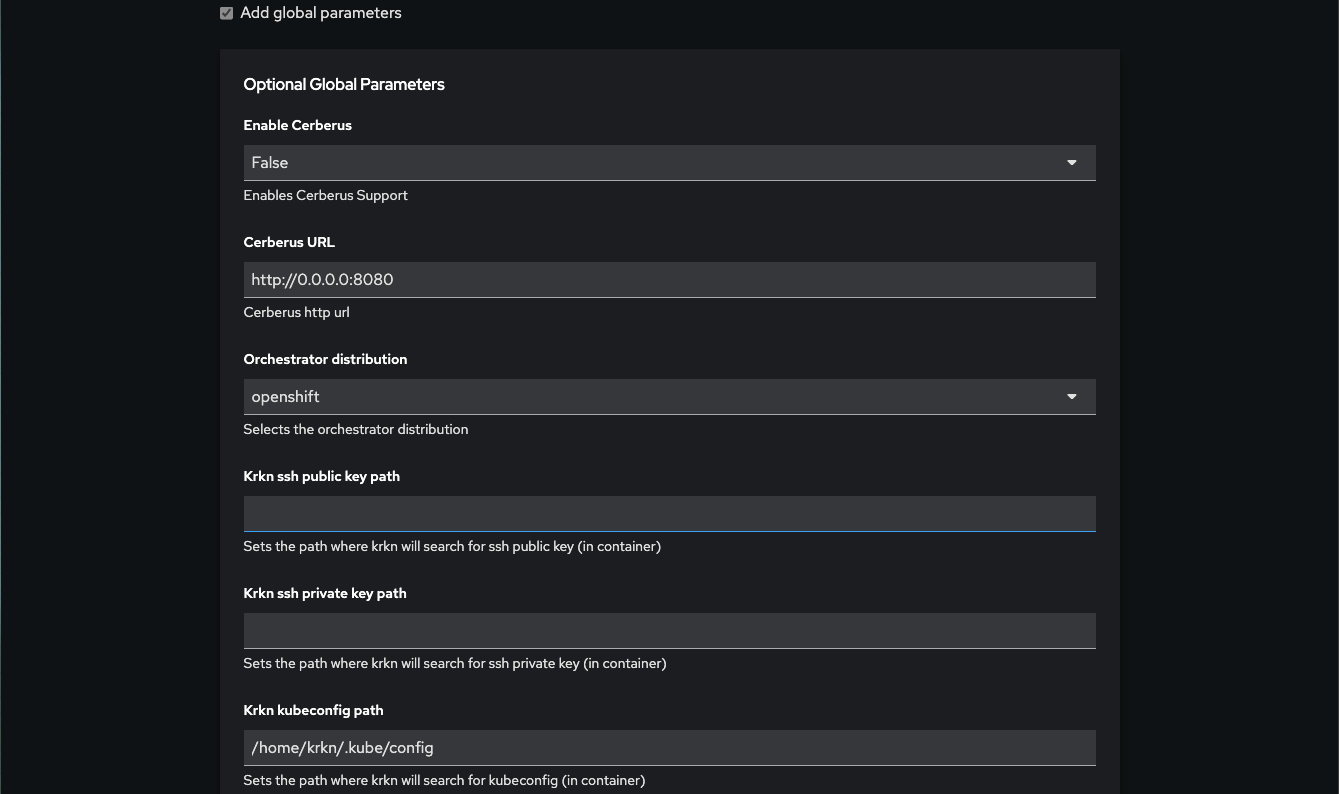
5. Mount Files
Optionally attach configuration files previously uploaded through File Management. Files are available via a select dropdown.
6. Preview
Review a summary of all configured parameters before execution.
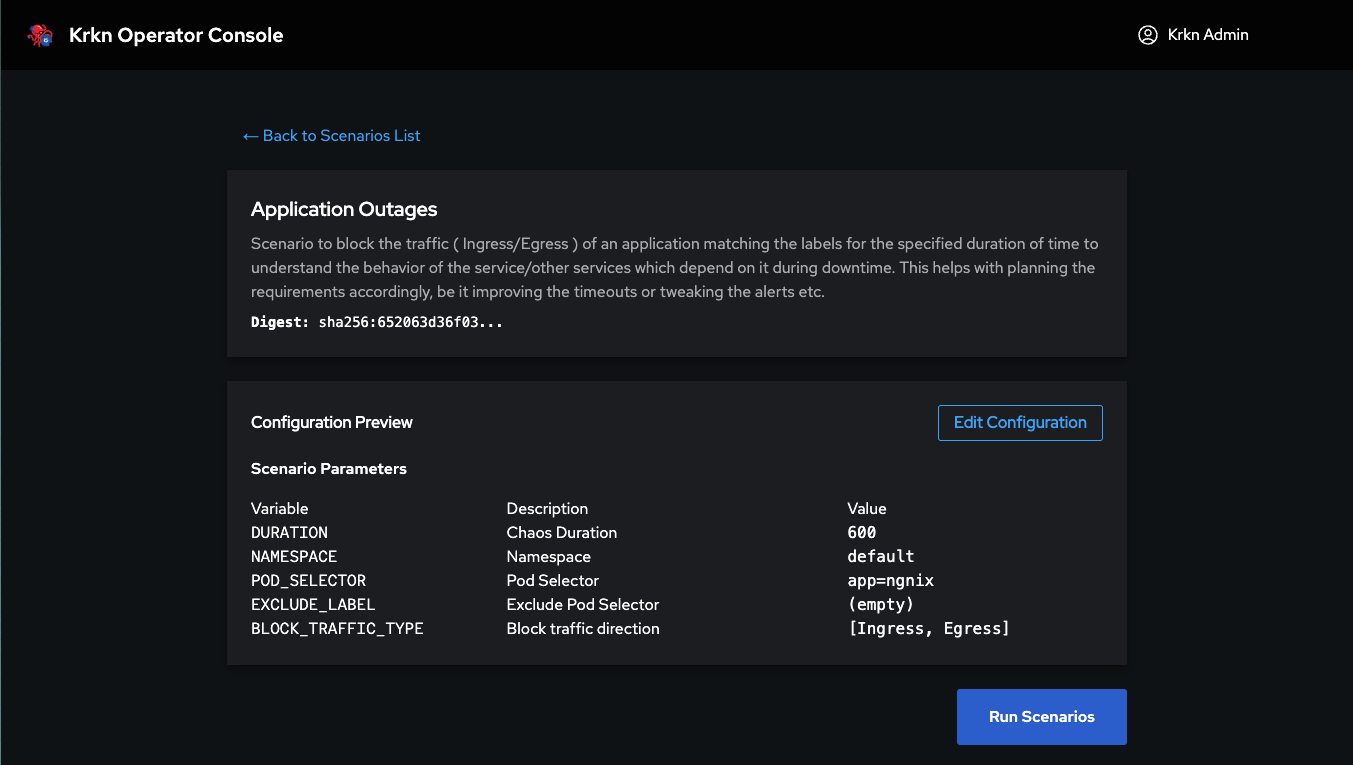
7. Run
Launch the scenario. You are redirected to the Jobs page where you can monitor the execution in real time.
1.3.4 - Chaos Studio
Design visual chaos workflows with serial and parallel execution
Chaos Studio Run
A visual drag-and-drop editor for designing complex chaos workflows. Build graphs of scenarios that execute in series or parallel, and measure application resilience with the Resiliency Score.
This walkthrough is retained with v1.0.0 documentation and may show an earlier interface.
Creating and Saving Workflows
Creating a New Workflow
- Navigate to Chaos Studio from the main navigation
- Click the “New Workflow” button to start a blank canvas
- Give your workflow a meaningful name that describes its purpose
Adding Nodes
- Click the “Add Node” button or drag from the node palette
- Position nodes on the canvas by dragging them
- Configure each node by clicking on it and selecting:
- Registry: Choose your scenario source
- Scenario: Select the chaos scenario to run
- Parameters: Set mandatory and optional parameters
- Cloud credential: Optionally load a saved cloud credential for cloud-dependent scenarios
- Files: Mount any required configuration files
Connecting Nodes
- Click and drag from a node’s output port to another node’s input port to create dependencies
- Serial execution: connect nodes in a chain (A → B → C)
- Parallel execution: connect one node to multiple targets (A → B and A → C)
Saving Your Workflow
- Click the “Save” button in the top toolbar
- The workflow is automatically saved to your workspace
- Saved workflows appear in the Chaos Studio workflow list
- You can edit saved workflows by selecting them from the list
Video Walkthrough
Visual Editor
- Nodes represent individual krkn scenarios
- Arrows define execution order — connect nodes to create dependencies
- Serial execution: chain nodes sequentially with single arrows
- Parallel execution: branch from one node to multiple targets
- Drag and drop to arrange the workflow visually
Node Configuration
Each node is configured exactly like a single scenario: select a registry, choose a scenario, set mandatory/optional/global parameters, optionally load a cloud credential, and mount files.
Global Parameters in Workflows
When configuring global parameters for workflow nodes:
- Elasticsearch: Select from saved admin-configured endpoints to index metrics across the entire workflow
- Prometheus: Configure Prometheus integration for metric collection
- Cerberus: Enable cluster health monitoring during scenario execution
INFO
Configure Elasticsearch in global parameters to track metrics across all nodes in a workflow. This provides centralized observability for complex multi-scenario executions.
Cloud Credentials in Workflows
Cloud-dependent nodes can use saved credentials configured under Cloud Credentials Management.
When configuring a node:
- Open Load Cloud Credential
- Select a credential available to your group
- Cloud fields for that provider become masked; other providers’ fields are hidden
Each node can select its own credential (for example one AWS credential on a zone-outage node and a BMC credential on a power-outage node).
INFO
You can select credentials available to your group but cannot create new ones from Chaos Studio. Contact your administrator to add credentials.
Clone: duplicate a configured node to repeat the same scenario multiple times within the workflow.
Validation
The editor validates the workflow before execution:
- Configured nodes: green arrows and connections — ready to execute
- Unconfigured nodes: red arrows and red node border — must be configured before the workflow can run
Only fully configured nodes can be connected and executed.
Resiliency Score
INFO
Resiliency Score quantifies how well your application withstood a chaos workflow. Instead of a simple pass/fail, you get a numeric score based on real application metrics.
Enable the Resiliency Score on a workflow to measure application resilience:
- Enable the resiliency score option on the workflow
- Mount a PromQL file — a special file containing PromQL queries uploaded via File Management
- Queries execute during the workflow and their results contribute to the final score
- View the score in the Jobs page alongside the graph run results
The PromQL file defines which metrics to evaluate (latency, error rate, throughput, etc.) and their expected thresholds. The score reflects how closely the application maintained its expected behavior under chaos.
1.3.5 - File Management
Upload and manage reusable configuration files
File Management
Upload and manage text-based configuration files that can be used across scenario executions and Chaos Studio workflows.
This walkthrough is retained with v1.0.0 documentation and may show an earlier interface.
Uploading Files
Files are created by pasting content into the text input box — there is no file upload button.
| Constraint | Detail |
|---|---|
| Formats | JSON, YAML (text only) |
| Input method | Copy-paste into the text box |
| Metadata | Name, description, category |
| Visibility | Everyone or assigned to specific groups |
Where Files Are Used
| Context | Purpose |
|---|---|
| Run Scenarios | Mount as configuration file during scenario parameter setup |
| Chaos Studio | Mount as configuration file on individual nodes |
| Chaos Studio — Resiliency Score | Mount as PromQL query file for resiliency score calculation |
1.4 - Releases & Roadmap
Krkn Operator release strategy, roadmap, and compatibility matrix
This document outlines the Krkn Operator release strategy, roadmap, and how the community prioritizes features, bug fixes, and security updates.
Roadmap
v0.4.0-beta
Released
Current release
- Chaos Studio
- Resiliency Score
v1.0.0
Released
OCM Cluster communication improvements
- Scenario Save/Replay
- Cluster Proxy Support
- Per node resiliency score
- Save/Edit/Delete Workflow Templates
v1.1.0
In Progress
Scenario Rollback
- Scenario Rollback
- Cluster liveness check
- Operator Hub distribution channel
- Chaos Studio scenario import
- Elasticsearch views (summary charts, metric views, and alerts)
- Signed krkn-hub images
- Operator Backup/Restore
- Krkn AI
Release Cadence
Krkn Operator aims to deliver feature releases every 6–8 weeks. These releases may include new features, enhancements, usability improvements, and other roadmap items driven by community feedback and contributor activity.
The release cadence is intended to balance rapid delivery of value to users while maintaining stability and quality across supported environments.
Feature Requests and Roadmap
Community feedback plays a key role in shaping the future of Krkn Operator.
Feature requests submitted through GitHub issues, enhancement proposals, community discussions, and feedback forms are reviewed regularly and considered as part of the project roadmap.
Features are prioritized based on:
- Community interest
- User impact
- Project goals
- Contributor capacity
Planned enhancements and major initiatives will be communicated through project documentation, GitHub, community meetings, and release notes.
Bug Fixes and Security Updates
Bug fixes and security updates are prioritized independently of the feature release cadence.
Critical security vulnerabilities and high-impact issues may be addressed through patch or minor releases outside the normal release cycle when necessary.
Community contributions for bug fixes, testing, and validation are always welcome.
Release Notes
Each release includes documentation for:
- New features and enhancements
- Bug fixes
- Security updates
- Compatibility updates
- Breaking changes and deprecations
- Upgrade or migration guidance, when applicable
Any compatibility changes, breaking changes, or upgrade considerations will be documented as part of the release notes to help users plan upgrades and understand changes between releases.
Getting Involved
The Krkn community welcomes feedback, feature requests, bug reports, testing, and code contributions. Community participation helps shape the roadmap and improve the overall user experience.
For feature requests or bug reports, please open an issue in the Krkn-operator GitHub repository or participate in community discussions.
1.5 - Feedback
Share feedback on the Krkn Operator Developer Preview
Feedback options for this archived release are available through the current Operator feedback page or the Krkn Operator issue tracker.
1.6 - OCM/ACM Compatibility
Supported platforms and ACM/OCM versions for Krkn Operator

OCM/ACM Compatibility
Krkn Operator supports multi-cluster chaos testing on Kubernetes and OpenShift. Cluster discovery can be manual or automated through ACM/OCM integration.
INFO
Multi-cluster works without ACM/OCM. Clusters registered manually through the web console have the exact same capabilities as clusters discovered via ACM. The integration is optional — it adds automatic discovery, not functionality.
Platform Support
| Platform | Status |
|---|---|
| Kubernetes 1.19+ | Supported |
| OpenShift 4.x | Supported |
ACM Compatibility
The following versions of Red Hat Advanced Cluster Management have been tested and validated with Krkn Operator:
| ACM Version | Status |
|---|---|
| 2.14 | Tested |
| 2.15 | Tested |
| 2.16 | Tested |
OCM Compatibility
The following versions of Open Cluster Management have been tested and validated:
| OCM Version | Status |
|---|---|
| 1.1.0 | Tested |
| 1.2.0 | Tested |
| 1.3.1 | Tested |
INFO
Older ACM versions may work but are not actively tested. We recommend running one of the validated versions above.
How ACM Integration Works
When ACM is enabled (--set acm.enabled=true at install time), Krkn Operator deploys a dedicated component that connects to the ACM hub and automatically discovers managed clusters. Discovered clusters appear in the same cluster pool as manually registered targets — users select from both without distinction.
See Provider Configuration for setup details and Installation for the Helm flag.